


In this article, we will discuss about Theme Customization and the best way to customize a Magento 2 theme.
How can you actually customize it?
It is a big question for all of us. Theme customization is not knotty, but we find it difficult to make it efficient and smooth.
Here is the deal:
To perform magento 2 theme customization, you have to take over 2 main stages: Â firstly creating a child theme, then starting the customization process.
A. How to make the Child Theme as fast as possible:
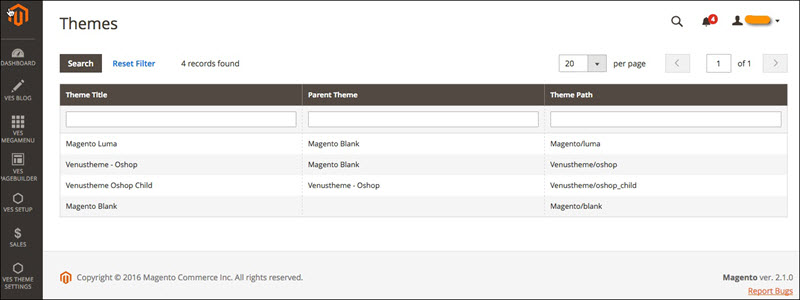
Step 1: Go to Content > Design > Themes – Make sure that your child theme (Venustheme Oshop Child) appears in the theme list.
Step 2: Click Stores > Configuration > Design (Magento 2.0.x) or Go to Content > Design > Configuration, choose the Design Theme tab, select the theme (Venustheme Oshop Child) within the dropdown list, click Save Config
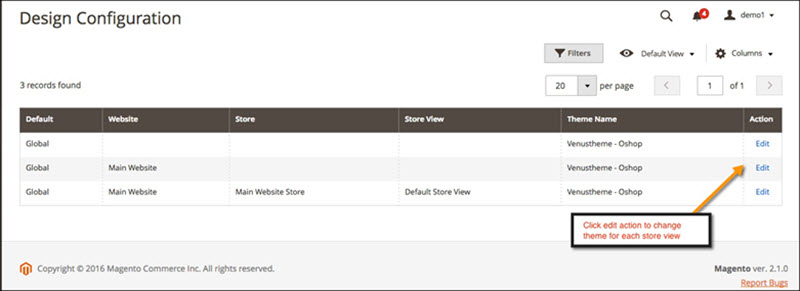
And choose child theme:

Step 3: Add the only changed files, not all files into the child theme’s directories.
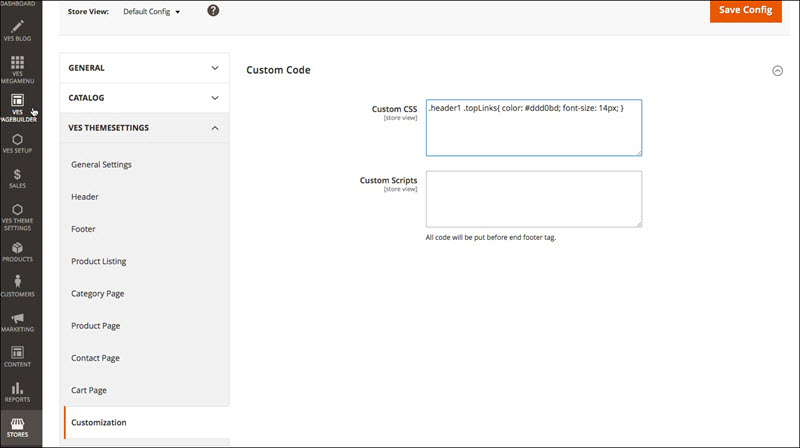
 Step 4: It’s better to add your own custom css styles into Stores > Configuration > Ves Themesettings > Customization, or edit each sections for general pages, and specify pages.
– Custom Css Code:
– Custom Style Options:
– Or you can add custom css code in the file: app/design/frontend/Venustheme/theme name(oshop_child)/web/css/custom.css
Step 5: We provide the theme customization service with additional cost, please contact us in Request Customization.
B. Detailed process for customization:
Table of Contents
1.     How to change the fonts in theme?
As you may now, Venustheme is using google web fonts, so that you can change the google web fonts or use your custom fonts as you want.
1.1.           Change google web fonts:
Ex: Change body font of ves_ishop theme from “Montserrat†to “Robotoâ€. And custom headings font, product element font to “Verdanaâ€
– Go to admin > Ves Theme Settings > General Settings > Font Settings. Config options “Body fonts†and “Custom fontsâ€
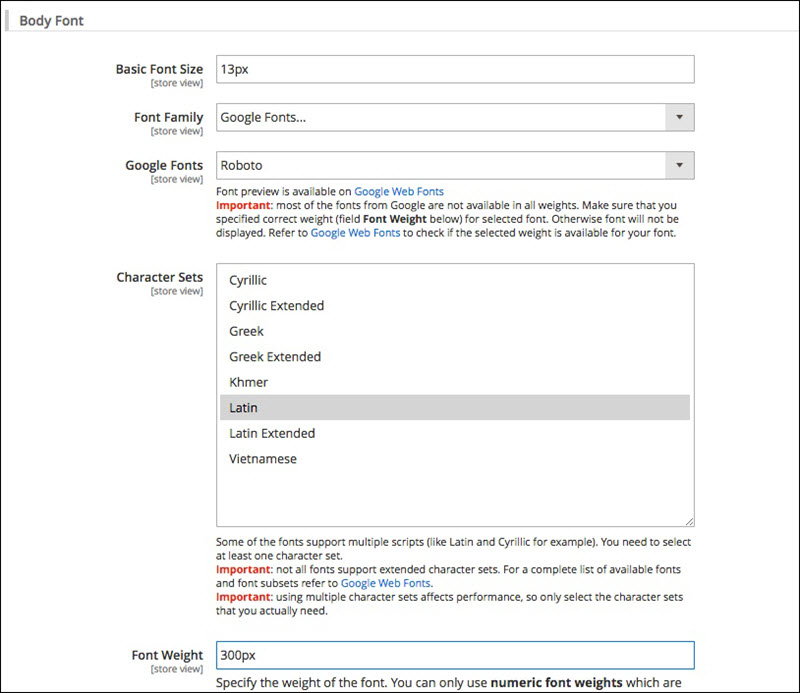
– Config “Body fonts“:
Input “Font Size†= 13px
“Font Family†= “Google Fonts…â€
“Google Font†= “Robotoâ€
“Character Sets†= “Latinâ€
Input font weight value (100px, 300px, 400px, 500px,…) as you want, or leave it empty.
– Config “Custom Fontsâ€:
Click “Add†custom font button, then choose “Custom, Google fonts†= “Robotoâ€, input “Font Size“, “Font Weight†as you want.
Then input “Font Targets† – This option is css selector, which html elements will been applied the custom font.
a, Custom font for heading elements:
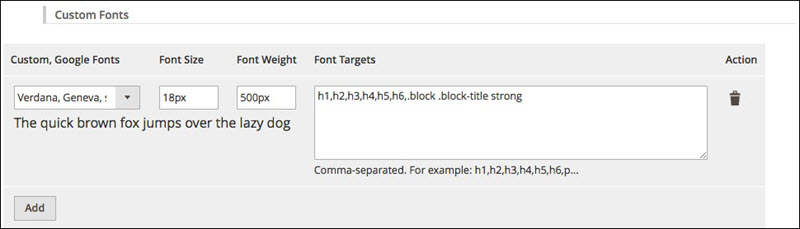
We use “Font Targets†is: h1,h2,h3,h4,h5,h6,.block .block-title strong
b, Custom font for product element blocks:

We use “Font Targets†is:
.product-block .product-item-inner, .product-block .product-item-details .product-item-name
1.2.           Load and use the custom fonts:
– Upload the font file into the folder “â€
– Edit the file “â€
2.     How to create new header?
Step1:Â Created file header1.phtml on this path:
app/design / frontend/ Venustheme/ theme_name / Ves_Themesetting / templates / header /
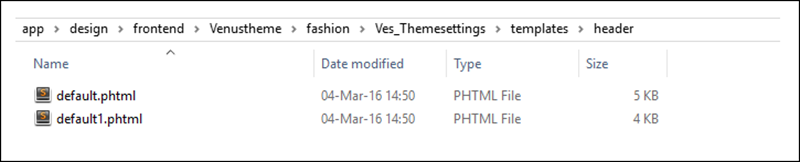
Step2: You can design and change position block on the header at this file header1.phtml
<?php
$ves = $this->helper('Ves\Themesettings\Helper\Theme');
$sticky = $ves->getHeaderCfg("sticky_settings/sticky");
$sticky_type = $ves->getHeaderCfg("sticky_settings/sticky_type");
$logo = $ves->getHeaderCfg("sticky_settings/logo");
$menu = $ves->getHeaderCfg("sticky_settings/menu");
$search = $ves->getHeaderCfg("sticky_settings/search");
$custom_block = $ves->getHeaderCfg("sticky_settings/custom_block");
$topcart = $ves->getHeaderCfg("sticky_settings/topcart");
$topbar = $ves->getHeaderCfg("sticky_settings/topbar");
$enable_toplinks = $ves->getHeaderCfg("toplinks_settings/enable");
$show_search = $ves->getHeaderCfg("search_settings/search");
$show_topbar = $ves->getHeaderCfg("topbar/show_topbar");
if($sticky_type == 'all'){
$logo = $menu = $search = $topcart = $toplinks = $topbar= true;
}
?>
<div id="ves-header">
<div class="wrapper">
<!-- Top bar -->
<?php if($show_topbar): ?>
<div class="panel page-topbar hidden-xs hidden-sm clearfix <?php echo $topbar?"sticky-item":"sticky-item-hidden" ?>">
<div class="container">
<div class="ves-inner">
<?php echo $this->getChildHtml('skip_to_content') ?>
<?php if($currency_block = $this->getChildHtml('currency')): ?>
<div class="switcher-currency-wrapper hidden-sm hidden-xs">
<?php echo $currency_block ?>
</div>
<?php endif; ?>
<?php if($store_language = $this->getChildHtml('store_language')): ?>
<div class="switcher-language-wrapper hidden-sm hidden-xs">
<?php echo $this->getChildHtml('store_language') ?>
</div>
<?php endif; ?>
<div class="header-left hidden-xs hidden-sm">
<?php if($enable_toplinks){ ?>
<div class="header-links-wrapper pull-left">
<?php echo $this->getChildHtml('top_links') ?>
</div>
<?php } ?>
<div class="setting-wrapper pull-left">
<?php echo $this->getChildHtml('setting_links') ?>
</div>
</div>
<div class="pull-right">
<?php echo $block->getLayout()->createBlock('Magento\Cms\Block\Block')->setBlockId('bigmart-header-links')->toHtml();?>
<?php echo $this->getChildHtml('skip_to_content') ?>
</div>
</div>
</div>
</div>
<?php endif; ?>
<!-- header content -->
<div class="header-content clearfix">
<div class="ves-inner">
<div class="container">
<div class="row">
<div class="col-lg-3 col-md-3 col-sm-12 col-xs-12">
<div class="logo-wrapper <?php echo $logo?"sticky-item":"sticky-item-hidden" ?>">
<?php echo $this->getChildHtml('logo') ?>
</div>
</div>
<div class="col-lg-7 col-md-6 col-sm-12 col-xs-12">
<?php if($show_search): ?>
<div class="search-wrapper ves-autosearch">
<div class="dropdown-toggle hidden-md hidden-lg" data-toggle="dropdown">
<i class="fa fa-search"> </i>
</div>
<div class="search-content" role="menu">
<?php echo $this->getChildHtml('ves_autosearch') ?>
</div>
</div>
<?php endif; ?>
</div>
<div class="col-lg-2 col-md-3 col-sm-12 col-xs-12">
<div class="minicart-warp <?php echo $topcart?"sticky-item":"sticky-item-hidden" ?>"><?php echo $this->getChildHtml('minicart') ?>
</div>
</div>
</div>
<?php if($custom_block = $this->getChildHtml("custom_block")): ?>
<div class="customblock-wrapper <?php echo $custom_block?"sticky-item":"sticky-item-hidden" ?>">
<?php echo $custom_block; ?>
</div>
<?php endif; ?>
</div>
</div>
</div>
<!-- Menu top -->
<div class="ves-menutop clearfix <?php echo $menu?"sticky-item":"sticky-item-hidden" ?>">
<div class="container">
<div class="row">
<div class="col-lg-3 col-md-3 col-sm-12 col-xs-12 hidden-xs hidden-sm ">
<div class="vertical-menu">
<?php echo $block->getLayout()->createBlock('Magento\Cms\Block\Block')->setBlockId('bigmart-vertical-menu')->toHtml();?>
</div>
</div>
<div class="col-lg-9 col-md-9 col-sm-12 col-xs-12">
<div class="ves-inner">
<?php echo $this->getChildHtml('catalog.topnav') ?>
</div>
</div>
</div>
</div>
</div>
<?php if($sticky){ ?>
<script type="text/javascript">
require([
'jquery',
'Ves_Themesettings/js/theme'
], function(){
function getScroll () {
var b = document.body;
var e = document.documentElement;
return {
left: parseFloat( window.pageXOffset || b.scrollLeft || e.scrollLeft ),
top: parseFloat( window.pageYOffset || b.scrollTop || e.scrollTop )
};
}
jQuery(document).ready(function($) {
var h = jQuery('.page-header').height();
var myHeader = jQuery('.page-header');
var hasBreadcrumbs = false;
var breadcrumbs = jQuery(".breadcrumbs");
if(typeof(breadcrumbs) != "undefined" && breadcrumbs.length > 0) {
hasBreadcrumbs = true;
}
myHeader.data( 'position', myHeader.position() );
jQuery(window).scroll(function(){
var hPos = myHeader.data('position'), scroll = getScroll();
var h_px = jQuery("#ves-header", ".page-header").outerHeight(true)+"px";
if ( hPos.top < scroll.top) {
jQuery('.page-header').addClass("navbar-fixed-top keep-header");
var headerHeight = jQuery('.page-header').height();
<?php if($sticky_type == 'specify'){ ?>jQuery(".page-wrapper").css({"padding-top":headerHeight+"px"});<?php } ?>
jQuery(".sticky-item-hidden").css({"display":"none"});
if(!hasBreadcrumbs) {
jQuery("#maincontent").delay(1000).css("margin-top", h_px);
}
}else{
jQuery(".sticky-item-hidden").css({"display":""});
jQuery('.page-header').removeClass("navbar-fixed-top keep-header");
jQuery(".page-wrapper").css({"padding-top":""});
if(!hasBreadcrumbs) {
jQuery("#maincontent").delay(1000).css({"margin-top": ""});
}
}
});
});
});
</script>
<?php } ?>
<?php echo $this->getChildHtml('ves_navigation'); ?>
</div>
</div>The block is declared on this position container name=â€header.containerâ€:
app\design\frontend\Venustheme\theme_name\Ves_Themesettings\layout\defautl.xml
Example block: Setting:
Code in the header.phtml
<?php echo $this->getChildHtml('setting_links') ?>The block is declared in .xml
<!-- TOP LINKS: settings and navigation -->
<block class="Magento\Framework\View\Element\Template" name="setting_links" as="setting_links" template="Magento_Theme::html/setting.phtml">
<block class="Magento\Store\Block\Switcher" name="store_language_custom" as="store_language_custom" template="switch/languages_custom.phtml" ifconfig="ves_themesettings_header/language_switcher_settings/language_switcher"/>
<block class="Magento\Directory\Block\Currency" name="currency_custom" before="store_language_custom" template="currency_custom.phtml" ifconfig="ves_themesettings_header/currency_switcher_settings/currency_switcher"/>
</block>
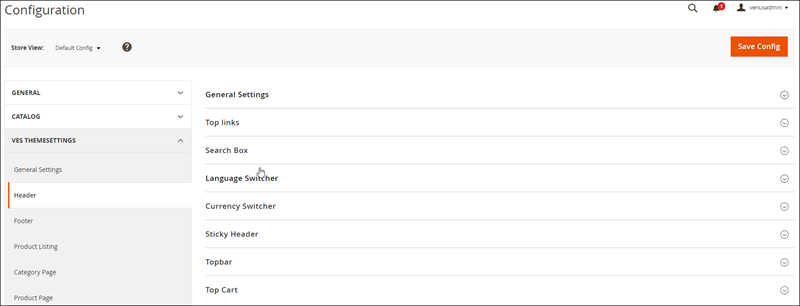
Step3:Â Go to admin / Ves themesetting / Header Tab: Selected header for each storeview

Step4:Â Â You can change config header on module Themesetting
Go to backend / Ves Themesetting / Header
Step5: Refresh cache system and view changed config the frontend
3.     How to create new skin?
Step1: Go to path app / design/ frontend / Venustheme / theme_name/ Ves_Themesetting / Web / css/ skins  created file skin.css
Example: Blue.css

In this file, include all css rule name, and change the color attributes, properties, text color, background color…
Example:

Sample css code (blue.css in theme Ves_Pencil):
.product-info-main .product-addto-links a:hover, .minicart-wrapper .action.showcart:hover::before,
.minicart-wrapper .action.showcart.active::before, .header-content .header-links-options a:hover,
.minicart-wrapper .actions a:hover, .product-reviews-summary .reviews-actions a:hover,
.ves-megamenu .dropdown-menu a:hover
{
	color: #1979c3!important;
}
.columns a:hover, .columns .alink:hover, .breadcrumbs .item strong,
.product-info-main .add-action:hover,
.product-info-main .price-box .price-including-tax + .price-excluding-tax .price,
.product-options-bottom .price-box .price-including-tax + .price-excluding-tax .price,
.product-info-main .price-box .weee + .price-excluding-tax .price,
.product-options-bottom .price-box .weee + .price-excluding-tax .price,
.product-info-main .price-box .weee .price,
.product-options-bottom .price-box .weee .price, .ves-menu .ves-vertical li.level0:hover > a
{
	color: #1979c3;
}

.scrollup, .block.newsletter .action.subscribe:hover,
.product-block .product-image .product-item-actions .actions-secondary .add-to-wishlist:hover,
.product-block .product-image .product-item-actions .actions-secondary .add-to-compare:hover,
.product-block .product-image .product-item-actions .actions-secondary .quick-view:hover,
.product-block .product-image .product-item-actions .actions-secondary .add-to-wishlist:focus,
.product-block .product-image .product-item-actions .actions-secondary .add-to-compare:focus,
.product-block .product-image .product-item-actions .actions-secondary .quick-view:focus,
.product-block .product-image .product-item-actions .actions-primary .add-to-cart
{
	background-color: #1979c3;
}

._keyfocus *:focus, input:focus:not([disabled]), textarea:focus:not([disabled]), select:focus:not([disabled]){
	box-shadow: 0 0 3px 1px #1979c3;
}

.action.primary:hover, .action.primary:active, .action.primary:focus {
    background: #1979c3;
    border-color: #1979c3;
    color: #fff;
}

.widget-carousel .owl-nav .owl-prev, .productlist-widget .owl-nav::before, .widget-carousel .owl-nav .owl-next,.ves-menutop .ves-megamenu li.level0:hover > a{
	background: #1979c3!important;
}
.productlist-widget ul.etabs li a, .footer-top .block .block-title strong{
	color:  #1979c3;
}
.owl-carousel .owl-nav [class*=owl-]{
	color:  #1979c3;
}
.ves-menutop .ves-megamenu{
	border-top-color: #1979c3!important;
}
.widget-images .image-item a:before{
	border-color: #1979c3!important;
}
textarea, input[type="text"], input[type="password"], input[type="url"], input[type="tel"], input[type="search"], input[type="number"], input[type="datetime"], input[type="email"]{
	border-color: #1979c3;
}Step2: Change config skin color for each storeview
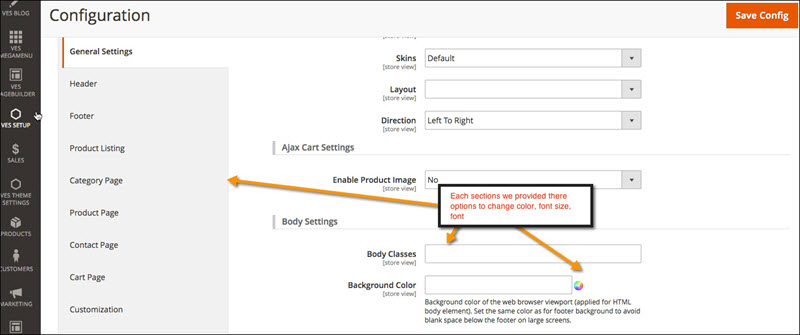
Go to admin / Ves Themesetting / General Settings tabs:

Step3:Â Refresh cache system and view it on frontend.
4.     How to add top link?
In venusthemes, there are 2 ways to add custom top links:
4.1.           In backend:
This function in Venustheme works very well. You can go to backend > Ves Theme settings > Header > Top Links, then add custom link on top-link you want to show:

– With Link option: you can input the link route (ex: contact, the link on frontend will been generated to http://yourdomain.com/contact). Or you can input direct link at here.
The code to call custom links we defined in the file : app\design\frontend\Venustheme\theme_name\Ves_Themesettings\templates\html\link.html
<?php
/**
 * Copyright © 2015 Magento. All rights reserved.
 * See COPYING.txt for license details.
 */

// @codingStandardsIgnoreFile
?>

<?php
$ves = $this->_ves;
$vesData = $this->_vesData;
$html = '';
$id = $block->getIdModifier() ? '-' . $block->getIdModifier() : time();
?>

<div class="header-links" id="header-links<?php echo $id?>">
    <div class="actions dropdown options header-links-options">
        <div class="action toggle switcher-trigger" id="header-links-trigger<?php echo $id?>">
            <strong><?php echo __('My Account') ?> </strong>
        </div>
        <ul class="dropdown header-links-dropdown" data-mage-init='{"dropdownDialog":{
        "appendTo":"#header-links<?php echo $id?> > .options",
        "triggerTarget":"#header-links-trigger<?php echo $id?>",
        "closeOnMouseLeave": false,
        "triggerClass":"active",
        "parentClass":"active",
        "buttons":null}}'>
        <?php
        foreach ($this->getLinks() as $link) {
            $html .= $this->renderLink($link);
        }
        echo $html;
        ?>
        <?php
        //Start call custom top links in ves theme settings
        $custom_links = unserialize($ves->getHeaderCfg('toplinks_settings/custom_links'));
        unset($custom_links['__empty']);
        foreach ($custom_links as $_link) { ?>
        <li class="<?php echo $_link['classes'] ?>" >
            <a href="<?php echo $vesData->filter($_link['link']) ?>" target="<?php echo $_link['target'] ?>"><?php echo $_link['title'] ?></a>
        </li>
        <?php } ?>
    </ul>
</div>
</div>
4.2.           By layout xml:
For example:
– To create a link to a custom cms page “Contact Us†with route “contact-usâ€, you need to create a CMS page for example you create an “Contact Us†page with identifier as “contact-usâ€
The link access to contact page on frontend:Â http://domain.com/contact-us
– To add magento 2 top links, you need to add following code in default.xml of your theme
Add code in body tag of a file *.xml. For example:
app/design/frontend/Magento/YOUR_THEME/Magento_Theme/layout/default.xml
<referenceBlock name="header.links">
	<block class="Magento\Framework\View\Element\Html\Link" name="contact-link">
		<arguments>
			<argument name="label" xsi:type="string" translate="true">Contact Us</argument>
			<argument name="path" xsi:type="string" translate="true">contact-us</argument>
		</arguments>
	</block>
</referenceBlock>
The previous code will be redirected to “Magento\Framework\View\Element\Html\Link†class and tranfers label = Contact Us and path = contact-us (http://domain.com/contact-us)
After that, Check the PHP Magento\Framework\View\Element\Html\Link.php file, there is one link shown on frontend:
protected function _toHtml()
{
    if (false != $this->getTemplate()) {
        return parent::_toHtml();
    }
	return '<li><a ' . $this->getLinkAttributes() . ' >' . $this->escapeHtml($this->getLabel()) . '</a></li>';
}
5.     How to create image slider?
If You use Ves Pagebuilder module for your theme, to create image slider, you can use widget Ves Image slider or Content carsousel make image slider on your site.
5.1 Widget Ves Image slider
On the pagebuilder profile, add row, and add widget, selected widget name Ves image slider


Option1:Â Add content into text editor of widget

Option2:Â You can choose block static on dropdown

Admin / Content/ Blocks:
Content block: “Azshop Auto slider1â€

<div class="ves-slide02">
    <div class="slider-content">
       <h1>SPECIAL OFFER THIS WEEK</h1>
       <h2>EXCLUSIVE SAVINGS</h2>
       <h3>PROIN GRAVIDA NIBH VEL VELIT AUCTOR ALIQUET. AENEAN SOLLICITUDIN, LOREM QUIS BIBEND UM AUCTOR, NISI ELIT CONSEQUAT IPSUM</h3>
       <a class="btn" href="#">view more</a>
    </div>
    <a href="{{store url="women/"}}"> <img src="{{media url="wysiwyg/azshop/home02/slider_auto1.png"}}" alt="" /> </a>
</div>
Image on frontend:

Content: “Azshop Auto slider2â€
<div class="ves-slide02">
    <div class="slider-content">
       <h1>SPECIAL OFFER THIS WEEK</h1>
       <h2>EXCLUSIVE SAVINGS</h2>
       <h3>PROIN GRAVIDA NIBH VEL VELIT AUCTOR ALIQUET. AENEAN SOLLICITUDIN, LOREM QUIS BIBEND UM AUCTOR, NISI ELIT CONSEQUAT IPSUM</h3>
       <a class="btn" href="#">view more</a>
    </div>
    <a href="{{store url="women/"}}"> <img src="{{media url="wysiwyg/azshop/home02/slider_auto2.png"}}" alt="" /> </a>
</div>
Image on frontend:

View detail infomation slider at this link :Â http://demo4coder.com/azshop/
– Config carousel settings (the widget we are using owl carousel: http://www.owlgraphic.com/owlcarousel/ )

5.2 Widget Content carousel
On the pagebuilder profile, add row, and add widget, selected widget name Content carsousel
Config the same widget ves image slider
6.     How to custom category page?
6.1.           How to custom product item in category page?
– Venustheme is using the settings of module Ves Themesettings for listing product item, and list.phtml file in the folder: app/design/frontend/Venustheme/theme name/Magento_Catalog/templates/product/
Therefore, you can use settings for product items in admin > Ves Themesettings > Category Page or custom directly layout, change position of product info, add some custom code to show product attribute or add custom css class by edit the file list.phtml
6.2.           How to add a static block on sidebar in category page?
– The sidebar will show on category page have layout 2 columns – left, 2 columns – right, or 3 columns. To add a static block or any custom block on sidebar position, you can use widget instance in admin, or use layout xml to reference block.
– Reference static block on sidebar on category page:
- Add static block in admin > Content > Blocks > Add new block.
- For example: Create block with identifier = ishop-sidebar-productsEdit the file “app/design/frontend/Venustheme/theme name/Magento_Catalog/layout/catalog_category_view.xmlâ€. Then add reference block as this:
<referenceContainer name="sidebar.main">
        	<block class="Magento\Cms\Block\Block" name="sidebar-products" after="-">
                <arguments>
                    <argument name="block_id" xsi:type="string">ishop-sidebar-products</argument>
                </arguments>
            </block>
        </referenceContainer>
7.     How to change page layout of category page (1 column, 2 columns left, 2 columns right, or 3 columns)?
– The type of page layout used for a certain page is defined in the page configuration file, in the layout attribute of the root <page> node. Hence, if you want to change page layout of category page, you should customize “page configuration†file.
Example: Change the layout of Category page from default “1-column†to “2-column with left bar“. To do this, edit the file:
app/design/frontend/Venustheme/<theme>/Magento_Catalog/layout/catalog_category_view.xml
<page layout="2columns-left" xmlns:xsi="http://www.w3.org/2001/XMLSchema-instance" xsi:noNamespaceSchemaLocation="urn:magento:framework:View/Layout/etc/page_configuration.xsd">
...
</page>
8.     How to show product attribute value as brand name?
In this section, we will demonstrate by the following example.
We have a product attribute with code: sku we want to show brand information under product title
– Edit the file “app/design/frontend/Venustheme/<theme>/Magento_Catalog/templates/product/list.phtmlâ€
– Find the line code:
 <?php if($show_name){ ?>
                    <strong class="product name product-item-name">
                        <a class="product-item-link"
                        href="<?php /* @escapeNotVerified */ echo $_product->getProductUrl() ?>">
                        <?php /* @escapeNotVerified */ echo $_helper->productAttribute($_product, $_product->getName(), 'name'); ?>
                    </a>
                </strong>
                <?php } ?>
– Update with the code after line code above:
<?php echo __("SKU: ").$_helper->productAttribute($_product, $_product->getName(), 'sku'); ?>9.     How to custom product item in listing blocks?
Listing blocks: Related products, Upsell Products, Crossell Products, New,…
Product item will show some information as this:

To config for product item in listing blocks, you should customize admin > Ves Themesettings > Product Listing, then the phtml files of product listing blocks we are storing in the folder:
app/design/frontend/Venustheme/theme name/Magento_Catalog/templates/product/list/
with files: items.phtml and items_carousel.phtml
10.     How to add products block on left sidebar on category page?
In Venustheme, we can config the products block on sidebar like this.
Featured products block are showing on left sidebar:Â http://demo4coder.com/ishop/default/women.html

Using ves products list extension, Venustheme has widgets for products tabs, products carousel block. So we can create widget instance in backend and reference the widget in sidebar block of any pages where you want (more about the widget instance please view at here: Link). Or we can use layout xml in theme file to reference a block on sidebar.
Step 1: Create CMS static block to add products list widget into content
– Go to admin > Content > Element > Block.
– Create the CMS block as this:

Shortcode:
{{widget type="Ves\Productlist\Block\Widget\Tab" widget_title="Featured" addition_class="sidebar-products" tabs="YToyOntzOjE4OiJfMTQ1NTg2OTE4NTI4Ml8yODIiO2E6NTp7czo5OiJzb3VyY2VfaWQiO3M6ODoiZmVhdHVyZWQiO3M6MTA6Iml0ZW1fdGl0bGUiO3M6MDoiIjtzOjEwOiJpdGVtX2NsYXNzIjtzOjA6IiI7czo5OiJhamF4X3R5cGUiO3M6MToiMCI7czo4OiJwb3NpdGlvbiI7czowOiIiO31zOjc6Il9fZW1wdHkiO3M6MDoiIjt9" conditions_encoded="a:1:[i:1;a:4:[s:4:`type`;s:50:`Magento|CatalogWidget|Model|Rule|Condition|Combine`;s:10:`aggregator`;s:3:`all`;s:5:`value`;s:1:`1`;s:9:`new_child`;s:0:``;]]" enable_animate_tab="1" animation_speed="normal" cycle="false" transition_in="fadeIn" transition_in_easing="swing" transition_out="fadeOut" transition_out_easing="swing" event="click" show_name="1" show_price="1" show_image="1" image_width="100" image_height="120" layout_type="owl_carousel" number_item="12" number_item_perpage="8" lg_column_item="1" md_column_item="1" sm_column_item="1" xs_column_item="1" number_item_percolumn="4" custom_item_height="400px" large_max_items="1" large_items="1" portrait_items="1" tablet_items="1" tablet_small_items="1" mobile_items="1" loop="1"}}Step 2: Reference CMS static block to sidebar block
– Edit file “app/design/frontend/Venustheme/[theme name]/Magento_Catalog/layout/catalog_category_view.xmlâ€
– Add reference block code as this:
(anh)
Source Code:
<referenceContainer name="sidebar.main">
        	<block class="Magento\Cms\Block\Block" name="sidebar-products" after="-">
                <arguments>
                    <argument name="block_id" xsi:type="string">ishop-sidebar-products</argument>
                </arguments>
            </block>
        </referenceContainer>
Step 3: Clean cache and run SSH command:
php bin/magento setup:upgrade --keep-generated
Hopefully this blog will be a help for you to customize your magento 2 theme.
Related blogs you may be interested in:
- Top 10+ Magento 2 Reward Points Extensions
- 10+ Best Magento 2 Store Locator Extension Free & Premium
- 14+ Best Magento 2 Social Login Extension Free & Premium
- Top 9 Magento 2 Reward Points Extension Free & Premium
- Top 10 Magento 2 Blog Extension Free & Premium
- 10+ Best Magento 2 FAQ Extension Free & Premium


