


In this article, we are giving you a full overview of Magento 2 Seo Default Settings.
As we all know, Search Engine Optimization is one of the key factors for any online store. While off-page SEO, that is citations and links pointing to your site, is important, you should never forget about on-page optimization. The latter is within your full control and thus can be implemented properly. That’s why you should take a look at our blog below to get a full general understanding about Magento 2 SEO Default Settings.
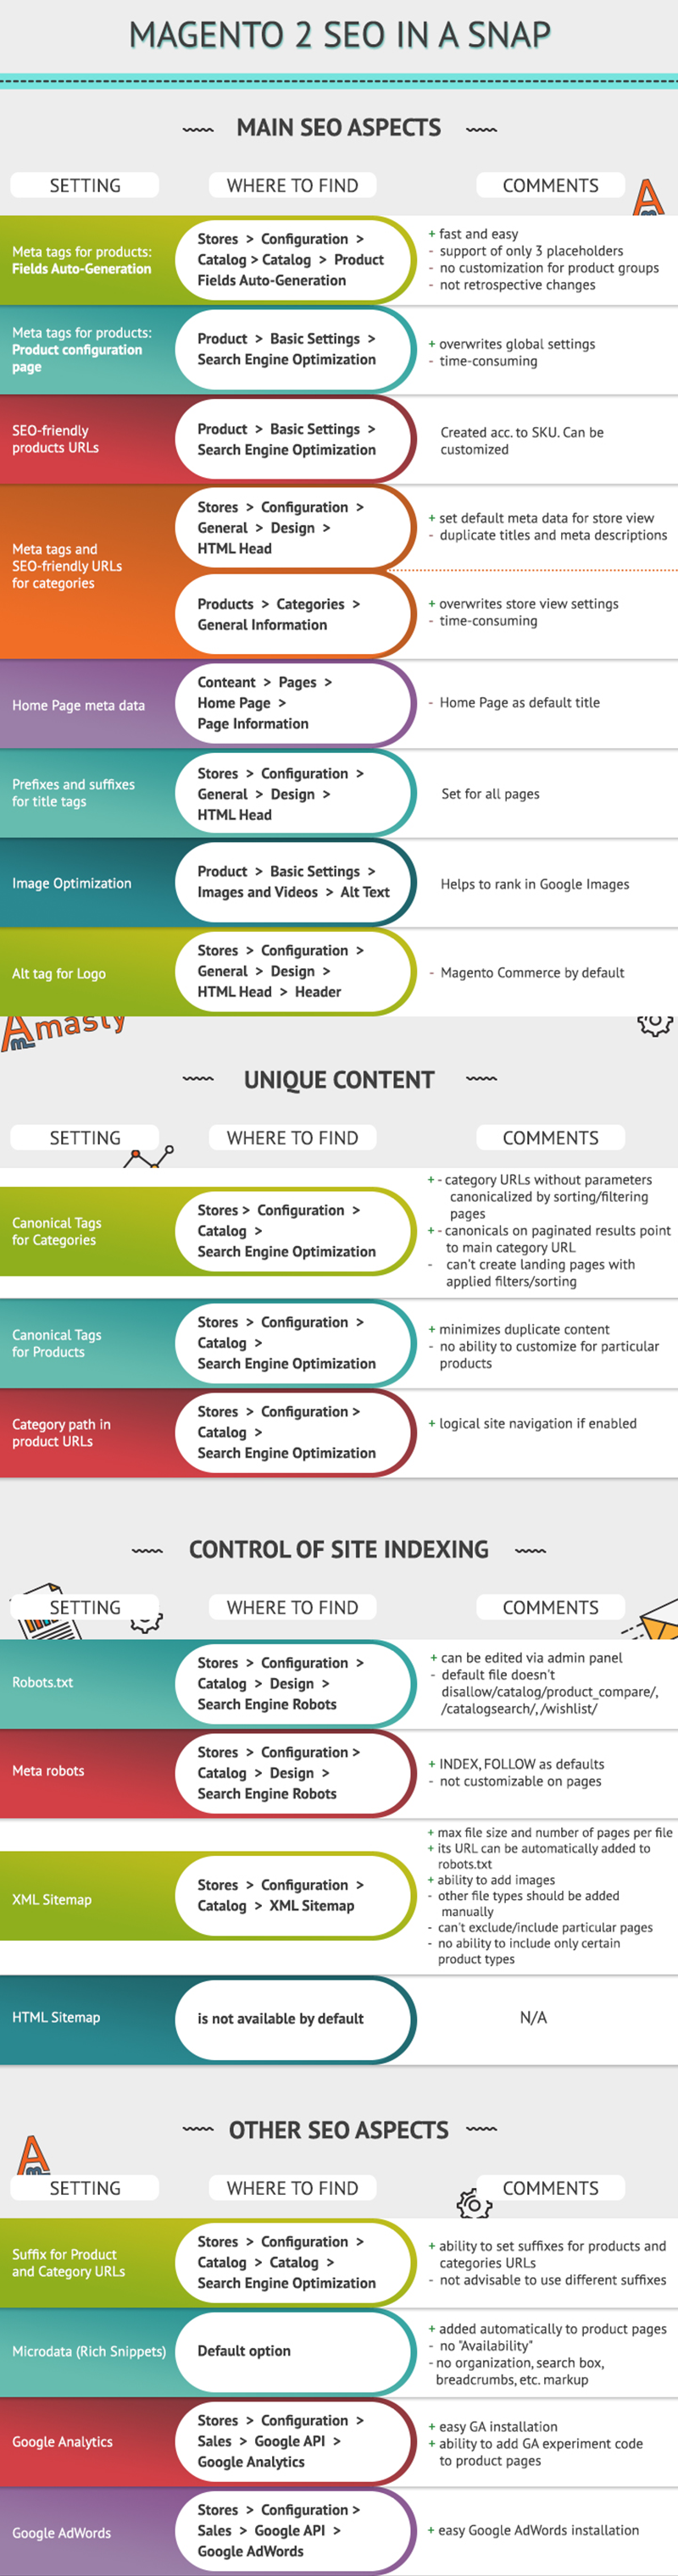
MAGENTO 2 SEO QUICK-THROUGH
Here’s a compilation of the most important points as a visual. You can also use it as a checklist for your store optimization.
I. MAIN MAGENTO 2 SEO ASPECTS
1. META TAGS FOR PRODUCTS
The importance of meta tags cannot be overestimated. Your site needs them to rank high and look attractive in SERPs. Product pages are most important for e-commerce sites, so I’ve decided to start with them.
There is one new Magento 2 SEO feature that you will like: Fields Auto-Generation. It helps to set templates for products meta data. They are applied on a global level.
The new setting can be found under Stores -> Configuration -> Catalog -> Catalog -> Product Fields Auto-Generation:
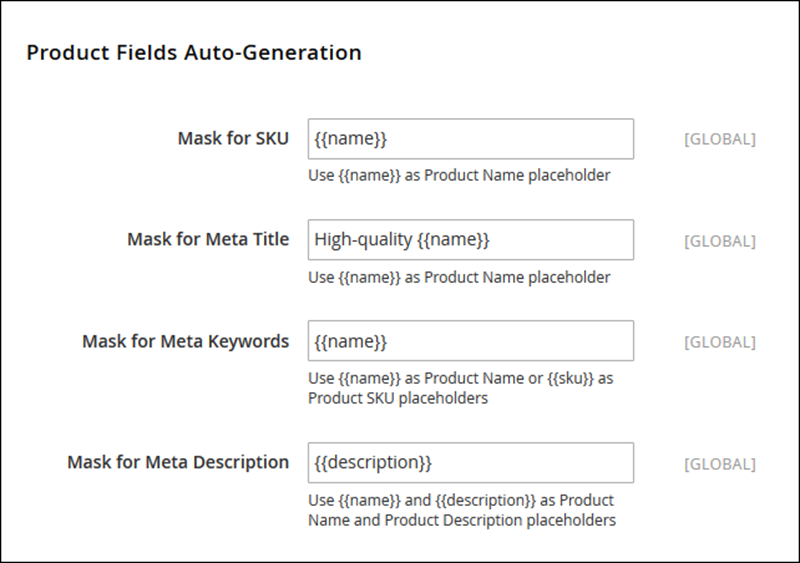
This is a great tool which will save you lots of time, especially if you have many products. However, there are some drawbacks I must point out:
-As auto-generated fields are set up globally, you can’t change them for products found in particular categories, say, for men and women clothes.
-Currently only 3 placeholders are supported: {{name}}, {{description}} and {{sku}}. This doesn’t provide much pliability.
-Adjustments you can make in these global settings are not retrospective, i.e. they won’t be applied to the existing products. -It’s not convenient if you’ve found a misspelling or just want to change something quickly.
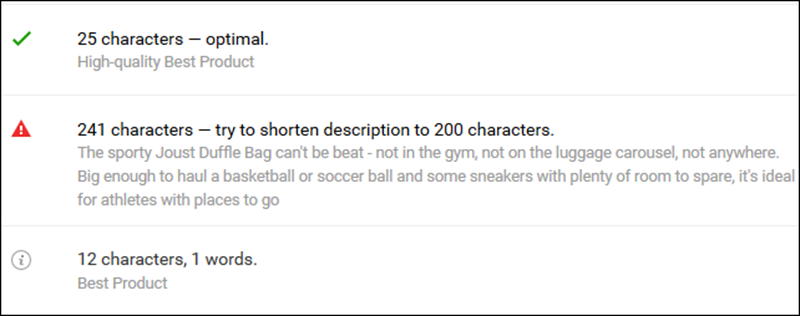
-The {{description}} placeholder may not be the best choice for Meta Description Mask if the products descriptions are long which is probably true for most stores (and it’s OK as they are the main content on such URLs). So if you use {{description}}, you will probably get something like this:
To sum it up, while a new Product Fields Auto-Generation feature is a great perspective, it is quite basic and limited right now.
Alternatively, you can edit titles and meta descriptions right from the product page settings: Product -> Basic Settings -> Search Engine Optimization. They will overwrite meta data set globally via Product Fields Auto-Generation. This way you can customize products titles and meta descriptions, but it will be extremely time-consuming if you have many products as you will have to make changes on a one-by-one basis.
2. SEO-FRIENDLY URLS FOR PRODUCTS
There is nothing new here. A product URL in Magento 2 is created in accordance with the SKU you’ve specified. But you can change or edit the URL if you need. This feature is also found in Magento 1 but under another set of settings: General Product Settings -> URL Key, while in Magento 2 you will see it in Product -> Basic Settings -> Search Engine Optimization.
3. META TAGS AND SEO-FRIENDLY URLS FOR CATEGORIES
Meta data for categories can be set up on a store view level in Stores -> Configuration -> General -> Design -> HTML Head. This can be overwritten on a category level at Products -> Categories -> General Information. Here you can also choose a URL for the category according to your needs.
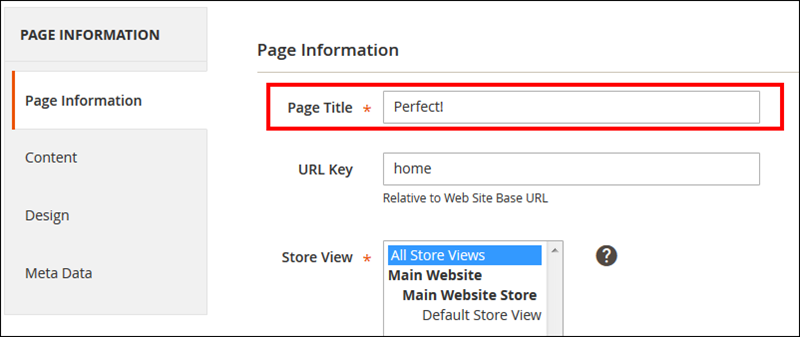
4. META TAGS FOR HOME PAGE
Magento 2 will continue the tradition of Magento 1 and set the default main page title to – guess what? – Home Page, right. So one of the first things you should do when you switch to Magento 2 is to customize this important tag in Content -> Pages -> Home Page -> Page Information:
Meta description and meta keywords can be changed on the Meta Data tab.
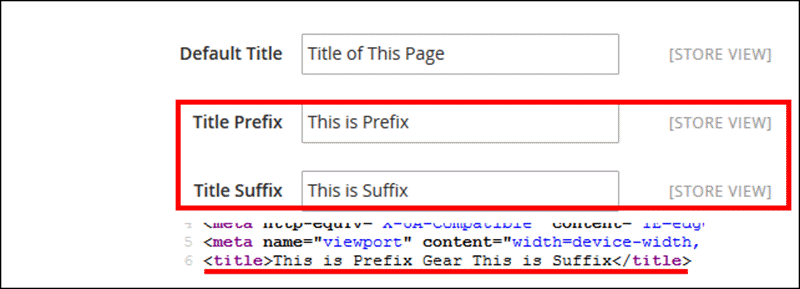
5. TITLE TAGS:Â PREFIXES AND SUFFIXES
If you need to add your company name or anything else either at the end or at the beginning of your title tags across all site pages, you can do it in Stores -> Configuration -> General -> Design -> HTML Head:
6. IMAGES OPTIMIZATION
Images optimization plays a vital role in site speed. The latter affects your site rankings: the faster your site is the more ranking ability it has. Unfortunately, neither Magento 1.X. nor Magento 2 has out-of-box tools for images compression.
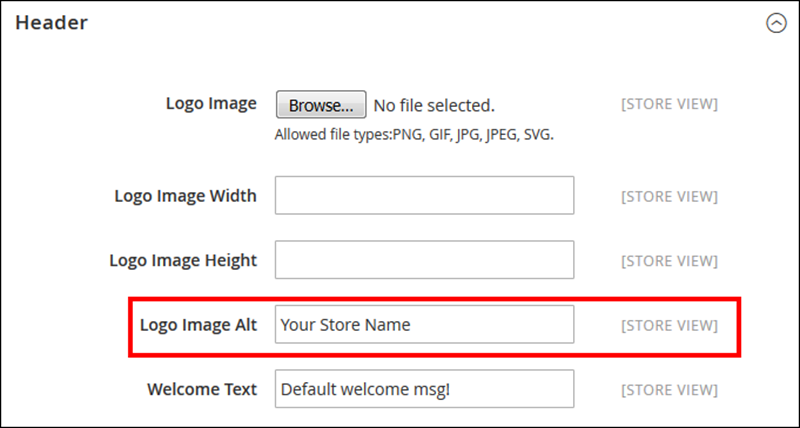
In Magento 2 you can add alt attributes for product images in Product -> Basic Settings -> Images and Videos -> Alt Text.
And please change the alt text for your logo image from “Magento Commerce†to something related to your brand in Stores -> Configuration -> General -> Design -> HTML Head -> Header:
II. UNIQUE CONTENT
I have already pointed out many duplicate content issues that can be found on most e-commerce sites. The good news is that Magento 2 has some out-of-the-box tools to solve many of these SEO problems.
1. CANONICAL TAGS FOR CATEGORIES
You can enable canonical tags for categories in Stores -> Configuration -> Catalog -> Search Engine Optimization (1)

This setting can also be found in Magento 1.X. but in Magento 2 it guarantees that canonicals are also applied to sorted and filtered pages. This minimizes the chances of thin content occurrences on your site.
NOTE:
-Instead of canonicalization, pages with sorted or filtered results can be noindexed either by setting up exclusions in Google Console or by adding meta robots <META NAME=â€ROBOTS†CONTENT=â€NOINDEX, FOLLOWâ€> to such URLs. But the latter is quite problematic since there is no default option for this in Magento 2, I’ll write about it in detail below. Mind that either canonicals or noindex tags should be used, not both entities simultaneously.
-If you want to utilize pages with applied filters and/or sorting options for SEO by creating landing pages, you can achieve this only with a special extension like Improved Layered Navigation for Magento 2.
-If you choose to set “Yes†for Canonical Link Meta Tag for Categories, canonical tags will be applied to paginated results too. While using them for such URLs is OK, adding Prev-Next tags is preferable.
2. CANONICAL TAGS FOR PRODUCTS
You can enable them under Stores -> Configuration -> Catalog -> Search Engine Optimization, please refer to the image above (2).
This option also comes from Magento 1.X. But one important question still persists: how is it possible to customize your canonical tags? For example, you want a Product A to be a canonical version of a Product B but you won’t achieve it in a default Magento 2 installation as in the product settings there is no custom field for adding a special canonical URL.
3. CATEGORY PATH IN PRODUCT URLS
If you navigate to Stores -> Configuration -> Catalog -> Search Engine Optimization, you’ll find an option to choose whether to enable or disable showing category paths in product URLs (see the image above, 3). These category indicators are good for indexing and clearly show the logic of store navigation. There are a few scenarios of using this setting in combination with canonical tags:
-You can choose not to add a category path to a product URL. In this case there won’t be any threats of potential duplicates.
-If you add category paths to product pages addresses and don’t enable canonicals, you might face duplicate content issues.
-If both category paths and product canonicals are enabled, each product page will have a canonical pointing to itself without any category indication. Concurrently, each product URL will have a category path in its address and be accessible from all the categories you’ve added it to.
III. CONTROL OF SITE INDEXING
1. ROBOTS.TXT
One of the greatest improvements of Magento 2 in terms of SEO is the ability to edit your robots.txt file right from the Magento 2 admin panel: Stores -> Configuration -> Catalog -> Design -> Search Engine Robots:
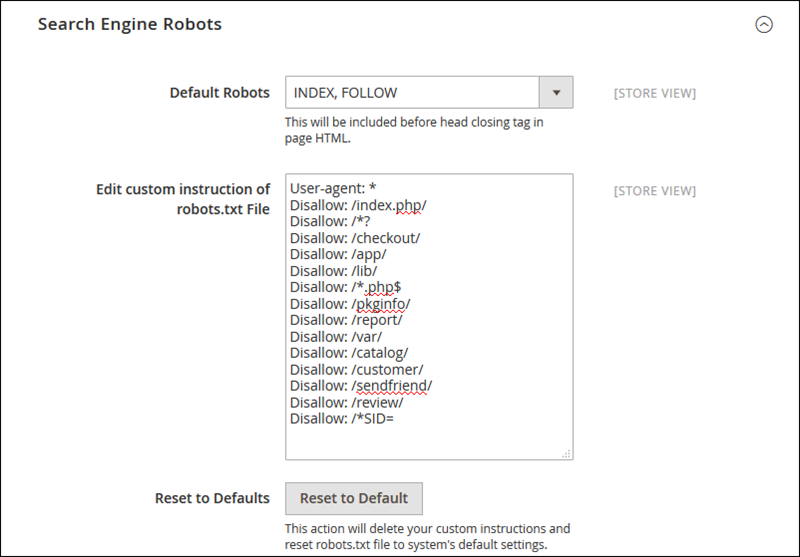
This is quite handy, isn’t it? Your robots.txt file can be accessed at yoursite.com/robots.txt which is the right place for it.
Though a default configuration of robots.txt is ok, you would probably want these directories disallowed as well: /catalog/product_compare/, /catalogsearch/, /wishlist/
2. META ROBOTS
As you can see on the image above, default meta robots in Magento 2 are set to INDEX, FOLLOW which is correct if you want your site to be indexed by Google. However, you can’t customize it on a specific page. For example, if you create a duplicate product to set up an experiment in Google Analytics, you will have to find a way to restrict search engines access to this page. You could add such URLs to the robots.txt file but this doesn’t always work as expected.
3. XML SITEMAP
Magento 2 provides many useful settings when it comes to generating an XML sitemap, you can find them in Stores -> Configuration -> Catalog -> XML Sitemap:
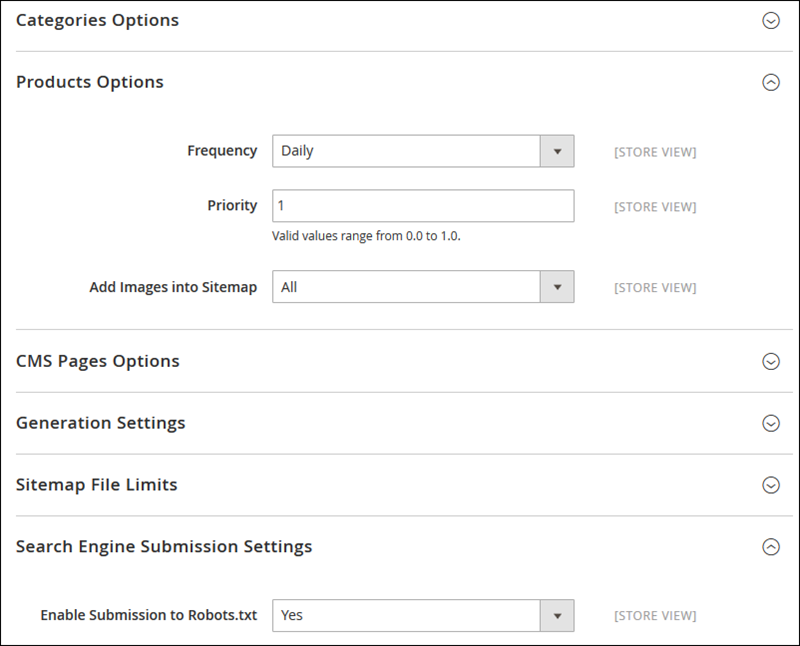
The most important changes are the following:
-All the images can be added to the sitemap automatically;
-There is an option to submit the URL of your XML sitemap to robots.txt.
-You have an ability to set the number of pages per file as well as the maximum file size.
And now here is some drawbacks:
-There is no opportunity to choose which product types should be added to the XML sitemap: grouped, simple, configurable, etc. You may want to add only one type, for example, if you have configurable products which consist of two or more, say, software version.Each version is a simple product and will be automatically included into the sitemap, while you need to include the configurable version only.
-An option to add images to the XML sitemap is certainly great, but what about other file types? If you want to include PDFs, Microsoft Word files, etc., you will have to add them manually.
-You can’t exclude or include particular pages if there is a need for that.
4. HTML SITEMAP
There is no HTML Sitemap for this version of Magento. Customization or extension is needed. It is recommended to get a must have HTML Sitemap for Magento 2 for several reasons. Firstly, you will get a clear and detailed structure of your website. And secondly, it drastically increases chances for your website to get noticed by search engines. Don’t forget that not only your customers but also web crawlers can read your HTML Sitemap. So, never omit a chance to install HTML Sitemap on your website. It is one more chance for the website to be indexed and crawled in full. Thus, it is a great opportunity for hundreds of your product pages to be reached.
IV. ADDITIONAL CHANGES
1. SUFFIX FOR PRODUCT AND CATEGORY URLS
This new Magento 2 SEO feature helps to set up a suffix for your site pages: Stores -> Configuration -> Catalog -> Catalog -> Search Engine Optimization:
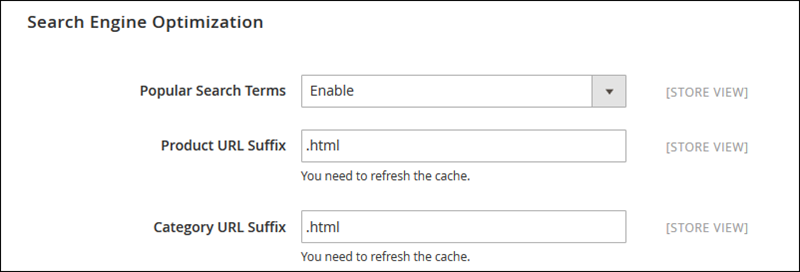 In theory, you can use different suffixes for products and categories. But you will hardly benefit from that as users expect to see an identical URL structure within one site. Moreover, using different suffixes may lead to numerous 404 pages: changes you make in these fields are retrospective but no redirects are created automatically. So if you used to have a product at yourstore.com/category/product.html and changed the product pages suffix to .ht, your former page will return a 404 error, so be careful with such significant changes.
2. MICRODATA, OR RICH SNIPPETS IN MAGENTO 2
This is a great innovation of Magento 2 and I’m sure merchants will be happy with it. All product pages have microdata added to them by default. There are no settings available: they are not necessary as almost all important tags are included:
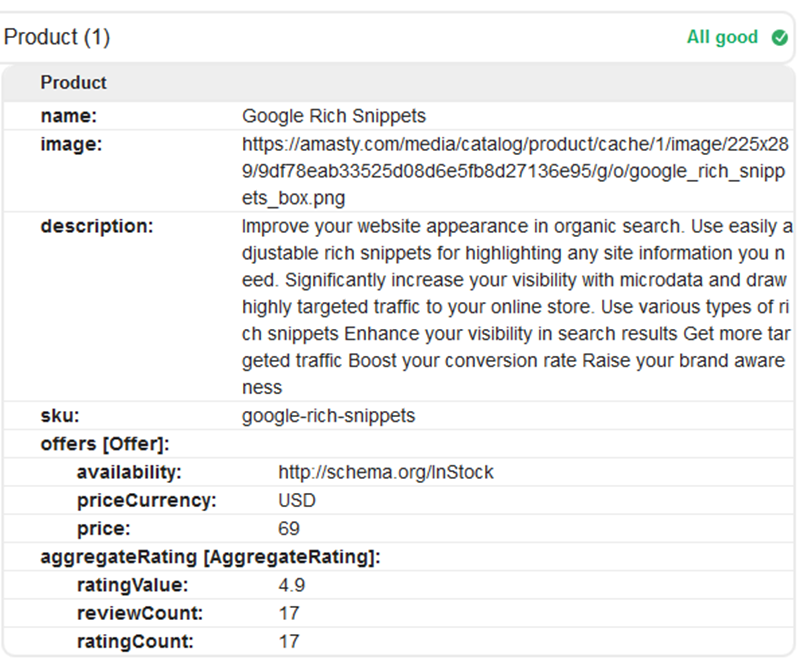
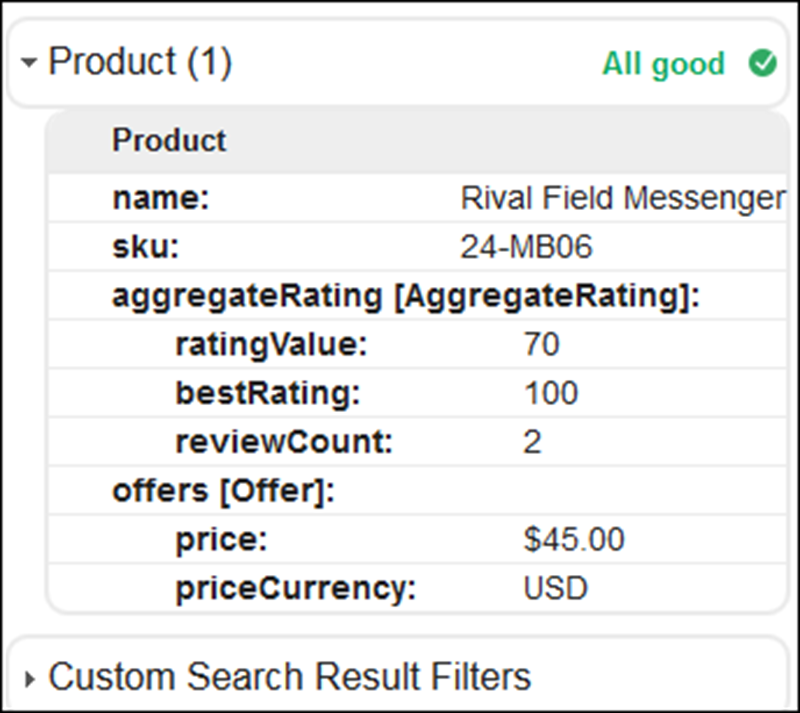 You may ask why I wrote “almost†above. Well, there is a reason for that: while Magento 2 default micro-data will help to get rich snippets in Google SERPs, it is still rather basic. For example, it’s missing “Availabilityâ€. You can compare the results from a page which uses Google Rich Snippets for Magento 2 extension:
As you can see, much more info is provided to Google in this case.
Additionally, only product snippets are available in a default Magento 2 configuration; if you want to add breadcrumbs, organization or search box markup, you will have to do it yourself or with the help of an extension, for example, the one I’ve mentioned above.
3. GOOGLE ANALYTICS AND MAGENTO 2
Magento 2 offers a handy tool for adding a Google Analytics tracking code to your store: Stores -> Configuration -> Sales -> Google API -> Google Analytics:
 All you need to do is to enable Google Analytics and add your Tracking ID which can be found under Admin -> Tracking Info in your GA Account.
Another great point is an ability to enable content experiments. If you do that, you will be able to add a Google Analytics Experiment code to a product page <head> section: Product -> Advanced Settings -> Product View Optimization:
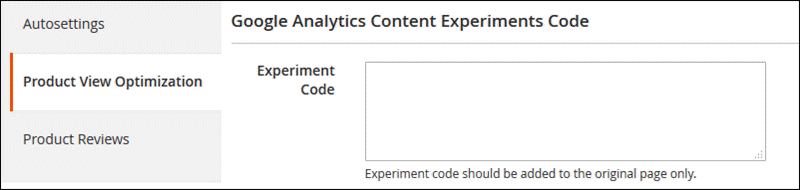
However, you will still need to create a duplicate product page and add a no index tag to it. Generally, other aspects of setting up split tests in Magento didn’t change.
By the way, there is an AB testing tool which saves lots of time on creating experiments without GA. It is currently available for Magento 1.X. only but we are working on its analog for Magento 2.
4. GOOGLE ADWORDS AND MAGENTO 2 SEO
Magento 2 developers decided to do their best and made Google AdWords implementation much easier for merchants. By navigating to Stores -> Configuration -> Sales -> Google API -> Google AdWords, you will see all the needed settings:
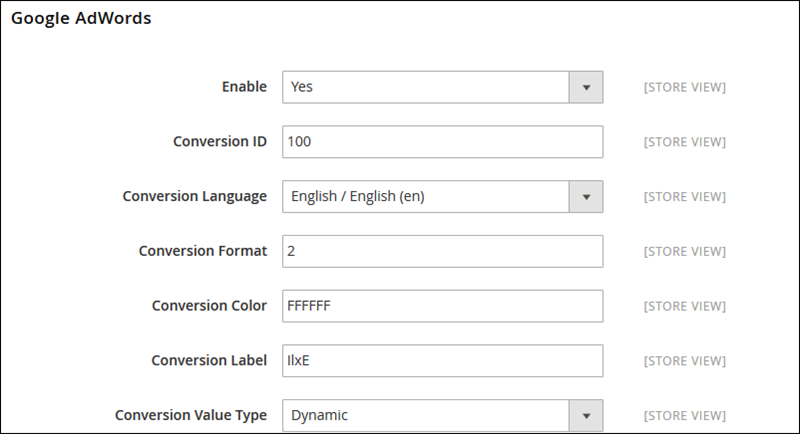
Conversion ID, Format, Color, etc. can be found in your Google AdWords account.
V. CONCLUSION
As you can see, a lot of things have been done to improve SEO and overall online marketing possibilities of Magento 2. However, while these new settings are useful, most of them are too basic and offer minimal to no flexibility when it comes to real stores and products.
Hopefully this magento 2 seo article will be helpful for you! If you still have any questions, please do ask them in comments!
Related Blogposts You May be Interested In:
- Top 10+ Magento 2 Reward Points Extensions
- 10+ Best Magento 2 Store Locator Extension Free & Premium
- 14+ Best Magento 2 Social Login Extension Free & Premium
- Top 9 Magento 2 Reward Points Extension Free & Premium
- Top 10 Magento 2 Blog Extension Free & Premium
- 10+ Best Magento 2 FAQ Extension Free & Premium


