


Your online store is growing, but your platform isn’t. That slow checkout process, those missing features, the constant workarounds – they’re holding you back more than you realise. Every day you stay put costs you sales and wastes precious time on technical band-aids.
Planning an eCommerce store migration may feel overwhelming seems complex. What if products disappear? Will SEO rankings tank? Can customer data transferred safely? These fears keeps many store ownwers them stuck on outdated systems.
It doesn’t have to be this way. With the right approach, you can transition smoothly without losing traffic or sleep. This guide walks through proven steps to migrate successfully, from planning to launch. So, let’s get started!
Table of Contents
I. Why Migrate Your eCommerce Store?
At some point, your current eCommerce setup may stop supporting your goals. Maybe it’s slow. Maybe it lacks features. Or maybe it’s just not keeping up with what your customers expect. Whatever the reason, migration isn’t just a tech move, it’s a smart business decision.
Your platform no longer fits your business.
What worked for you when you started might now feel limiting. You may have outgrown your platform’s features, or it simply doesn’t scale well. As your store grows, you need a system that grows with you.
You’re facing performance issues.
Slow load times, bugs, or frequent crashes hurt customer trust. If tech issues are draining your time or costing sales, it’s a strong sign to consider switching to a better-performing platform.
You want better design and flexibility.
Some platforms lock you into rigid templates or make it hard to customise. If you’re stuck with a layout that doesn’t reflect your brand or can’t support custom features, it’s time to upgrade.
You’re looking to save on costs.
The cost of running an eCommerce store adds up — from transaction fees to third-party tools. Migrating can actually lower costs if you choose a more affordable or all-in-one platform.
SEO and marketing tools are limited.
If you can’t optimise your store for search engines or integrate with your favourite marketing tools, you’re missing out on growth. A migration can give you access to more modern, SEO-friendly options.
You want tighter integration with your systems.
Your business runs on tools — CRMs, inventory systems,and email platforms. If your current store can’t sync with them easily, that’s another reason to consider migrating.
In short, migration isn’t just about switching platforms. It’s about choosing a setup that supports your goals, works better for your customers, and gives you the freedom to grow without limits.
II. Pre-Migration Checklist: All You Need Before Starting
Ready to move your eCommerce store migration? Hold on—rushing in without a plan is how mistakes happen. A good migration starts with preparation. Think of this checklist as your packing list before a big trip. Miss something, and you’ll regret it later. Let’s make sure you’ve got everything covered.
- Back up your entire store – Don’t risk losing data. Save everything first.
- Audit your products – Clean up old SKUs, duplicates, or out-of-stock items.
- Review customer data – Check for incomplete orders or outdated accounts.
- Document third-party integrations – List all plugins, APIs, and payment gateways.
- Check SEO elements – Note all URLs, meta titles, and descriptions.
- Set up a staging site – Test the migration safely before going live.
- Plan for downtime – Schedule the move during low-traffic hours.
- Inform your customers – Give them a heads-up about temporary changes.
- Assign tasks to your team – Who handles what? Avoid last-minute chaos.
- Budget for surprises – Migrations often have hidden costs—be prepared.
This checklist might seem like extra work, but trust me, it saves headaches later. A smooth migration starts with good prep. Once you’ve ticked everything off, you’re ready to move forward with confidence.
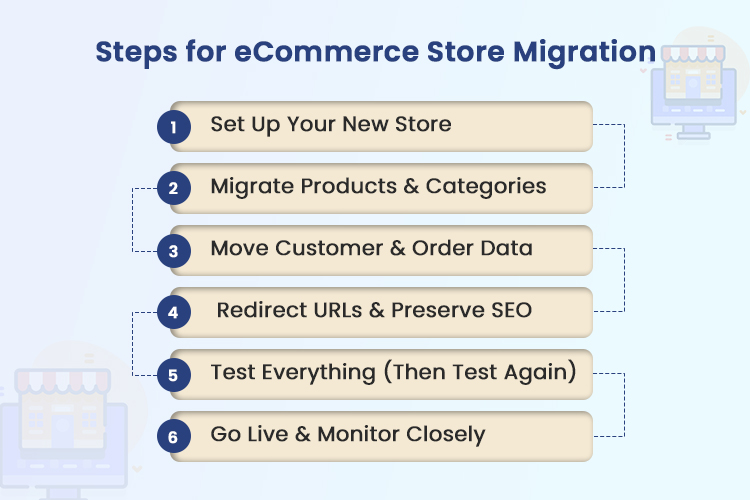
III. Simple Steps for eCommerce Store Migration
Migrating your store doesn’t have to be scary. Break it down into simple steps, and it becomes manageable, like moving houses one room at a time. Here’s a clear, stress-free process to follow so nothing gets missed.
Step 1: Set Up Your New Store
Before moving anything, your new store needs a solid foundation. This means choosing the right platform (like WooCommerce) and configuring the basics.
Steps to complete:
- Choose your new eCommerce platform
- Install necessary plugins/extensions
- Set up payment gateways and tax rules
- Configure shipping methods
For instance, there are many benefits of using WooCommerce because of its flexibility and extensive plugin ecosystem.
Step 2: Migrate Products & Categories
Your products are the heart of your store. Moving them carefully prevents inventory errors or missing items.
Steps to complete:
- Export product data (SKUs, descriptions, images) from old store
- Clean up outdated or duplicate products
- Import into the new store using CSV or migration tools
- Verify all images and variants are loaded correctly
Double-check every product. A missing image or wrong price frustrates customers.
Step 3: Move Customer & Order Data
Losing customer history hurts trust. Transfer logins, orders, and profiles seamlessly.
Steps to complete:
- Export customer emails, passwords (hashed), and order history
- Use a secure migration tool to preserve data integrity
- Test logins for key accounts before going live
- Ensure order IDs sync correctly for returns/support
Customers should never feel the switch. Their accounts must work like nothing changed.
Step 4: Redirect URLs & Preserve SEO
Broken links = lost traffic. Protect your Google rankings with smart redirects.
Steps to complete:
- Map old URLs to new ones (product/category pages)
- Set up 301 redirects (via .htaccess or plugin)
- Update internal links in blogs/pages
- Submit a new sitemap to Google Search Console
This keeps your hard-earned SEO juice. Skip it, and you’ll lose organic traffic.
Step 5: Test Everything (Then Test Again)
Never assume “it works.” Test like a customer would—because they will.
Steps to complete:
- Place test orders (all payment methods)
- Check mobile responsiveness
- Verify email notifications (order confirmations, passwords)
- Test checkout as a guest and a logged-in user
Find bugs now, not when real customers complain.
Step 6: Go Live & Monitor Closely
Flip the switch, but stay alert. Early days often reveal small hiccups.
Steps to complete:
- Schedule launch during low-traffic hours
- Keep the old site as a backup for 48 hours
- Monitor for failed orders/checkouts
- Watch the server load for crashes
Celebrate, but keep fixing. The first week is critical.
Migration isn’t magic—it’s methodical. Follow these steps, and you’ll minimise risks while setting up for growth. Stuck? WooCommerce experts can help smooth the process.
IV. Tips for a Smooth and Successful eCommerce Store Migration

Migrating an eCommerce store isn’t just about moving data. It’s about keeping your store running smoothly, your customers happy, and your team stress-free. These tips are based on real experiences and can make a big difference in how your migration goes.
1. Start with a clear plan
Before you even touch the new platform, map out your migration. Know what needs to move, what can be left behind, and who’s doing what. Having a clear roadmap keeps things organised and less chaotic.
2. Choose the right time
Don’t migrate during your busy season. Find a slower period when traffic and orders are lower. It reduces the risk of frustrating your customers if there are small hiccups.
3. Back everything up
Even if you think things are safe, take a full backup of your site. That includes product info, customer data, media, and even blog content. It’s your safety net if anything goes wrong.
4. Test in a staging environment
Never test your migration on the live site. Set up a staging version of your store to try things out. It lets you fix bugs and polish things without risking real traffic or sales.
5. Keep SEO in mind
Don’t lose your hard-earned traffic. Make sure all important URLs are redirected properly. Tools like 301 redirects help maintain your rankings and avoid broken links.
6. Communicate with your customers
Let your customers know what’s happening. A quick email or notice on your site can go a long way. It builds trust and helps manage expectations if things look different or go offline briefly.
7. Don’t forget integrations
Check if your current tools—like payment gateways, email marketing, and shipping—will work on the new platform. Reconnect or replace any that don’t. This avoids surprises post-launch.
8. Monitor after the switch
Your job doesn’t end at launch. Keep an eye on how things perform for the first few weeks. Watch orders, user behaviour, and reports to spot and fix issues early.
9. Get expert help if needed
Sometimes, it’s worth hiring someone who’s done it before. If you’re not confident, a developer or migration expert can save you a lot of time and headaches.
To wrap it up, store migration doesn’t have to be stressful. With some planning, communication, and attention to detail, you can move your store without hurting your business—or your peace of mind.
Wrapping Up
Migrating your online store doesn’t have to be complex, it’s just about taking the right steps at the right time. Start with a solid plan, test everything (twice), and keep your customers in the loop. The little details, like redirecting old links and checking payment gateways, can make all the difference between a messy transition and a seamless one.
Yes, it takes effort, but think of it as spring cleaning for your business. Once it’s done, you’ll have a faster, more flexible store that works the way you need it to. So, take it step by step, and before you know it, you’ll be up and running even better than before.


