We are living in an era of advanced technology, everyone has a tendency of shopping online a lot. Knowing the importance of developing a software supporting website, Magento 2.3 has been released with the tons of new excellent features to improve your site and rocket your business to the new level.
However, you are a beginner and you meet many difficulties in setting up the Magento 2.3 platform. Don’t worry! the tutorial below will assist
Remember that Magento 2.3 always requires must-have factors before setting up:
- PHP 7.2
- MySQL 5.7
- Mail transfer Agent (MTA) or an SMTP server
Now following me step by step to gain an understanding what you must do to install Magento 2.3.
Table of Contents
Stage 1: Download Magento 2.3 package
To start the installation process, you need to download Magento 2.3 files on your
There are two versions to download with and without sample data:
- Magento without sample data – An empty Magento installation with default theme but without any products.
- Magento with sample data – A Magento installation populated with sample products and articles. It’s useful if you want to test how your shop will look with a lot of products.
You can download here: https://magento.com/tech-resources/download
Stage 2: Upload files to server
After you extract the Magento 2.3 files, the next step you should do is to select preferred archive format. I highly recommend you to download with Zip because it’s supported by all operating systems. The following is to uploading the file to the server using an FTP client.
You are still in trouble with uploading Magento files. Don’t be nervous! You can follow here for more detailed instruction on how to upload website files
Stage 3: Create a database
Database is an organized collection of data which is essential for Magento 2.3 installation. It is used as a method of storing, managing, retrieving store information.
Look at the 3 steps below to see what you must do in order to create a database:
- Access your hosting account control panel and navigate to data section
- Create an empty database and assign a user for it
- write down database name, username and password.
Stage 4: Install Magento 2.3
Finishing the process of uploading files and creating MySQL database, you can head to the magento 2.3 installation for sure.
Open your web browser and access your domain name.
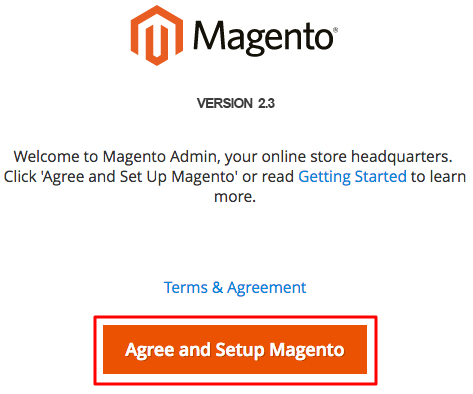
Before continuing, you must accept all Magento requirements by clicking Agree and Set up Magento button.

To install Magento 2.3, you should complete 6 steps as follow.
Step 1: Readiness check
Firstly, your hosting settings will be checked to ensure that everything works well.

If you can see Complete! you can now move on to the next step block. Yes, no mistakes happened. Press Next to continue.
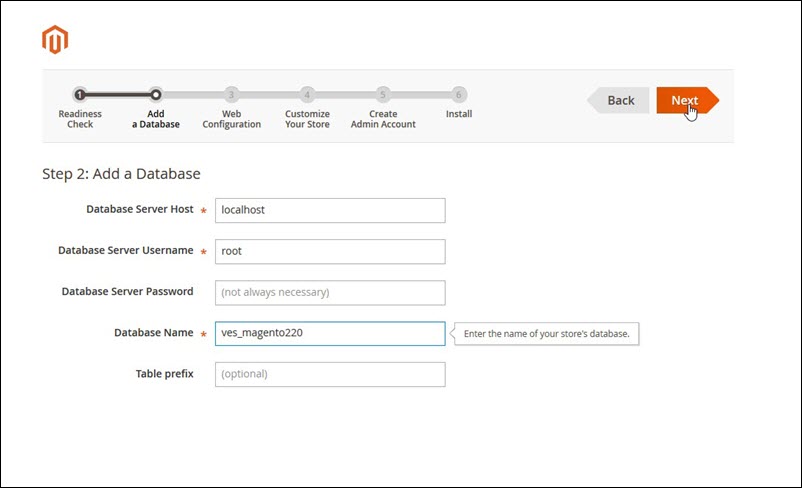
In this step, you are asked to update information of the MySQL database you created in the step above.

Step 3: Web Configuration
Pay attention to add store and administrator dashboard addresses that the two values are extremely important.

Step 4: Customize your store
This step displays 3 values Zone, Currency and Language so that you can set to your online store. You can change these values by coming to the admin dashboard.

Step 5: Create admin account
To come to the end of the installation, you must create an admin account in this step. This account will come with you to access Magento backend.

Step 6: Install
Press Install Now button to start the installation.

You have just experienced 6 steps to install Magento 2.3. The last thing you need to do is change permissions to 755 for app/etc directories. You can easily do this using FTP client or File Manager.
After finishing the installation process, a new page will appear that includes installation information you entered in the steps above.

Congratulations! you’ve installed Magento 2.3 successfully.
In conclusion, Magento is well-known for its functionality to support website development. With the latest version, Magento 2.3, upgraded with a number of outstanding features will surely help your store run smoothly.
That’s all for our guide to install Magento 2.3 platform. We hope that this tutorial will be useful to make your installment easier.
OTHER EXTENSIONS YOU MAYBE INTERESTED IN
- Magento 2 Multi Vendor Marketplace Pro
- Magento 2 SMTP Extension
- Magento 2 One Step Checkout CE Pro
- Magento 2 Hide Price
- Magento 2 Advanced Report
- Magento 2 Out of Stock Notification
- Magento 2 Image Gallery Pro
- Magento 2 Auction Extension
- Magento 2 Customer Quotation
- Magento 2 Marketplace Extension
- Magento 2 Marketplace Reward Point
- Magento 2 Affiliate Pro
- Magento 2 Store Pickup
- Magento 2 Mega Menu Pro
Related Posts
- How to use Magento 2.3 PWA Studio effectively
- 20+ Best Magento 2.3 Extensions for eCommerce in 2018 | Free & Premium
- 20+ Best Magento 2.3 Themes | Free & Premium
- Top 15+ Premium Magento 2.3 Bootstrap Themes Boosting Your Productivity
- 54+ Best Magento 2 Themes- Fastest and Super Responsive Templates (Magento 2.3 Updated)
- 57+ Best Free Magento 2 Extensions: Fast, Functional and Easy To Use (Magento 2.3 Updated)
- 10+ Best Magento 2 Free Themes (Magento 2.3 Updated)
- 50+ New Best Magento 2 Extensions Free & Premium | Fast & Easy To Use (Magento 2.3 Updated)


![[SALE OFF] Discount 30% All Premium Extensions On Christmas And New Year 2025 christmas-and-new-year-2025](https://landofcoder.b-cdn.net/wp-content/uploads/2024/12/christmas-and-new-year-2025-1-218x150.png)


