


With Magento 2, you can create many new tax rates basing on geographical areas like different states or different countries as you need. Tax, including tax rates and tax settings, is one of the important elements for the country to control business, particularly online business. In this tutorial, I will show you Quick way to Manage Tax Rate Magento 2 and Tax Settings in Magento 2.
Table of Contents
I. How to Manage Tax Rate Magento 2?
To manage tax rate Magento 2, we have to do 3 steps:
- Add Tax Rate
- Add Tax Rule
- Change the Existing Tax Rate.
1. Add Tax Rate
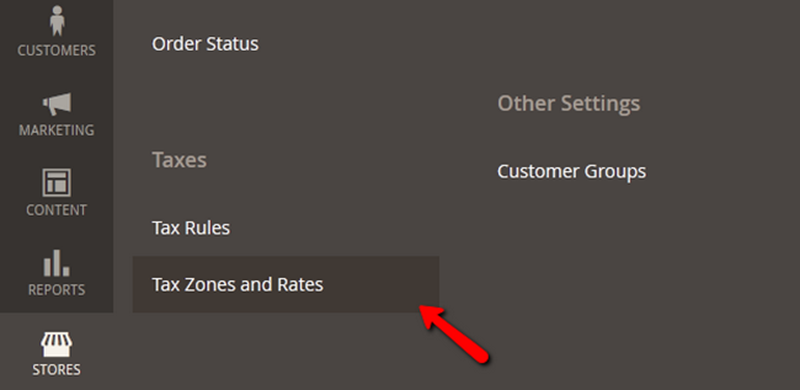
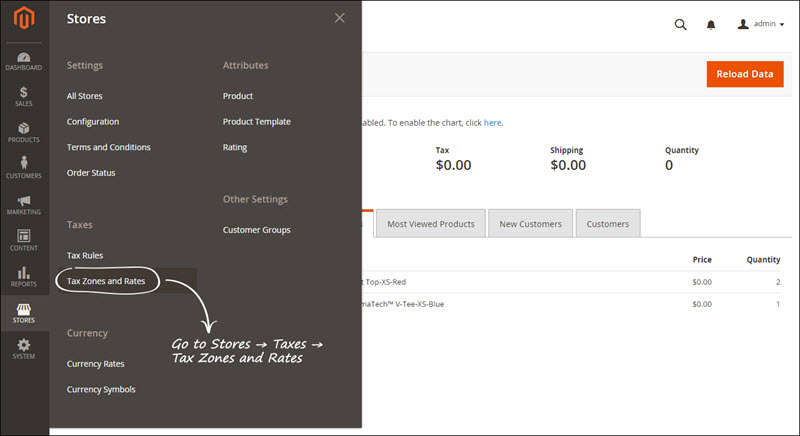
Step 1: To create a new Tax Rate, login to your website’s admin area and navigate to the Stores>Tax Zones and Rates section from the main admin panel.
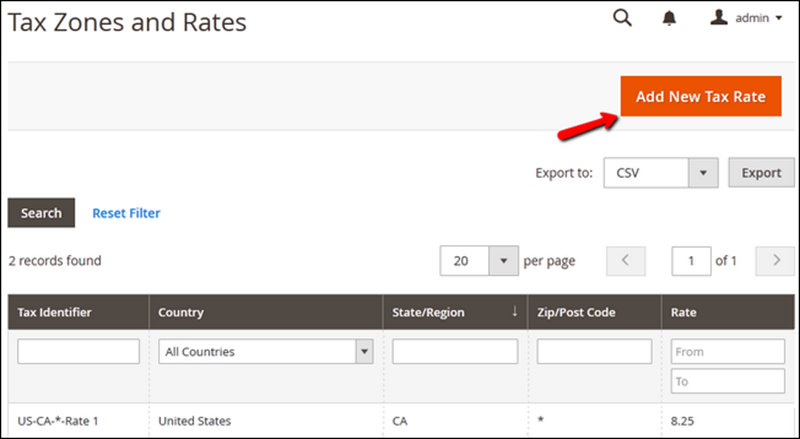
Step 2: Click on the Add New Tax Rate button.
Now you will be able to configure the tax rate:
-Tax Identifier – The name of the tax used for internal identification
-Zip/Post is Range – If selected you will be able to set up a Range of Post codes in the two fields below this one
-State – The State on which you wish to impose the Tax Rate (If your country does not have States, this option will be grayed out)
-Country – The Country on which you wish to impose the Tax Rate
-Rate Percent – The Tax Rate percentage the customer will need to pay
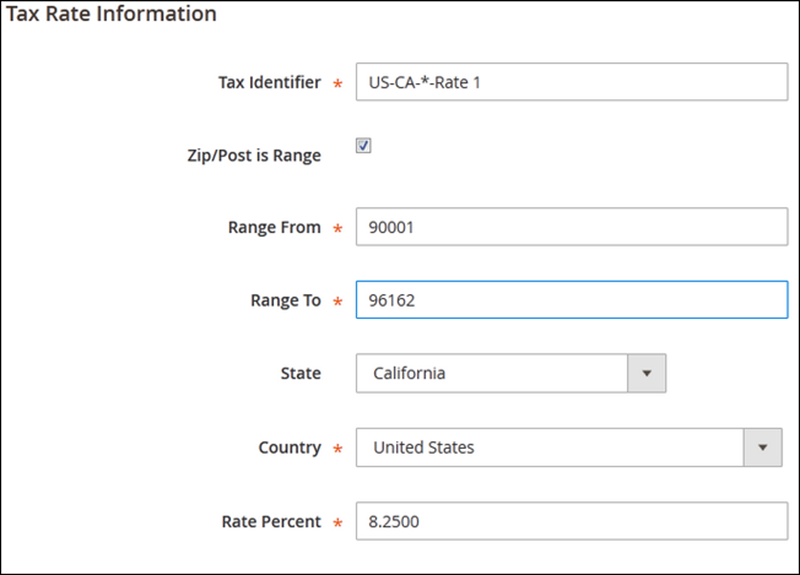
Step 3: When you are done, click on the Save Rate button to save the Tax Rate.
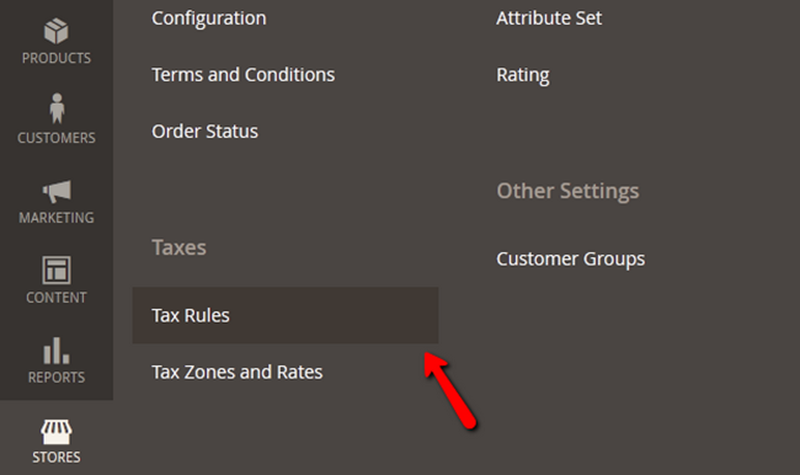
2. Add Tax Rule
Step 1: Once you have configured a Tax Rate you will want to implement it in a Tax Rule. To accomplish that, you will need to navigate to Stores>Tax Rules from your admin dashboard.
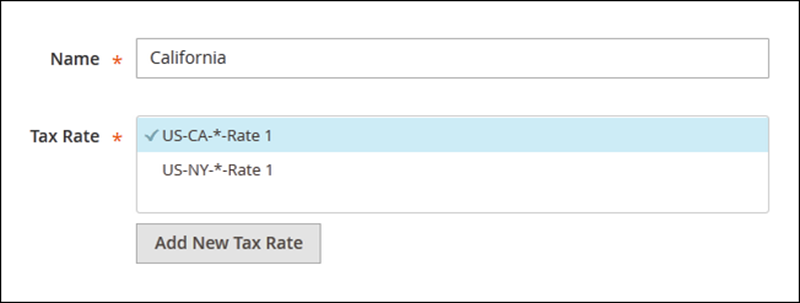
 Step 2: In the Tax Rule Information part of the configuration, you will need to put a Name for the Tax Rule and select the Tax Rate for it:
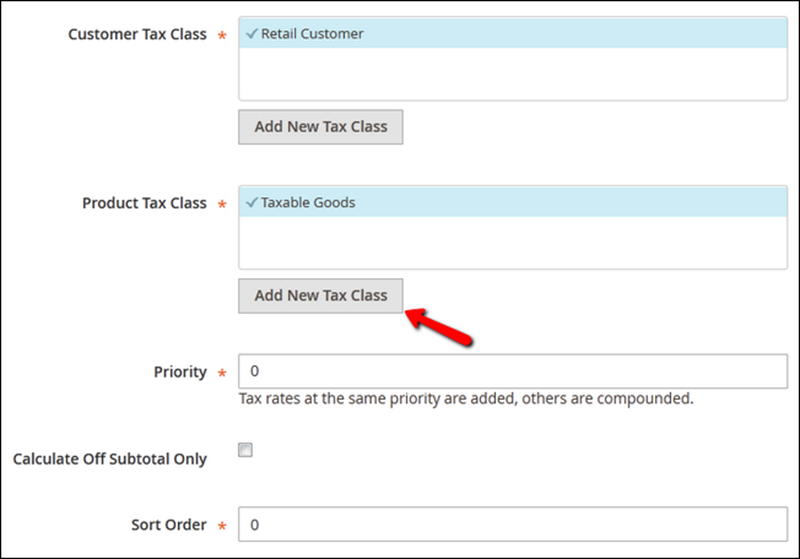
 If you expand the Additional Settings you will see a few more options to configure:
–Customer Tax Class – Customer Tax Classes are used in certain cases when the purchase is not retail (wholesale for example)
–Product Tax Class – Different types of products have different Tax Classes (food and electronics for example). To better manage your products, you can create a new Tax Class here that corresponds to the product’s type
–Priority – The priority of this class when calculating from multiple tax rules (If two classes have the same priority they will be added during tax calculation)
–Sort Order – Modifying this will change the display order of the tax if more than one tax can be selected (lower is higher with 0 being displayed on top)
Step 3: For additional settings regarding the Taxes calculation of your Magento 2 Store you will need to visit the Stores>Configuration section of your admin dashboard and then access Sales>Tax.
3. Change An Existing Rate
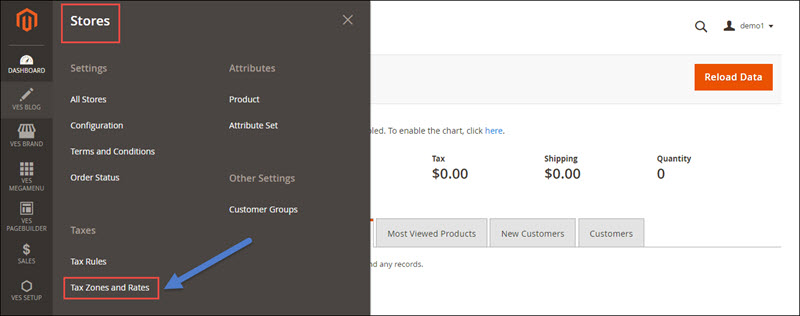
Step 1: On the Admin Panel, Stores > Taxes > Tax Zones and Rates.
 Step 2: Choose the tax rate you need to edit in the Tax Zones and Rates grid.
If include many rates in the grid, use the filter to find.
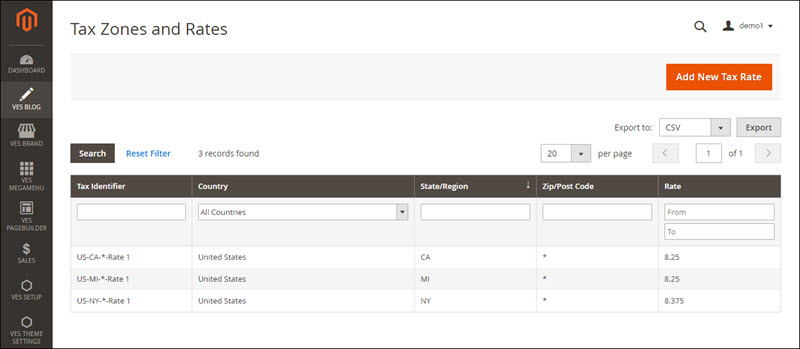 Step 3: Modify any information as you need, and then click on Save Rate to complete.

To sum up, adding and managing the tax rates is under the control of the “Tax Zones and Rates†tool to direct multiple taxes to a specific region. Basing on the tax settings of the stores, the system will calculate the tax correctly for customer’s order after all order information is completed.
II. How to Manage Tax Settings Magento 2?
Before you start managing your online store, you will need to change permissions to limit access to your store. Normally, you do not want many people to know about your taxes, so probably you need to change permissions first.
1. In Tax classes you will see the following:
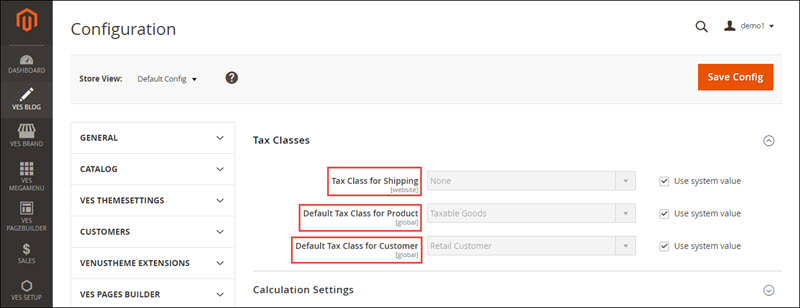
Select Tax class for Shipping. Here there are 2 default options: Taxable Goods and None. By default, your product’s tax class will be Taxable Goods and Default Tax Class for Customer will be Retail Customer. You cannot change it here.
2. In Calculation Settings. This is what you will see:
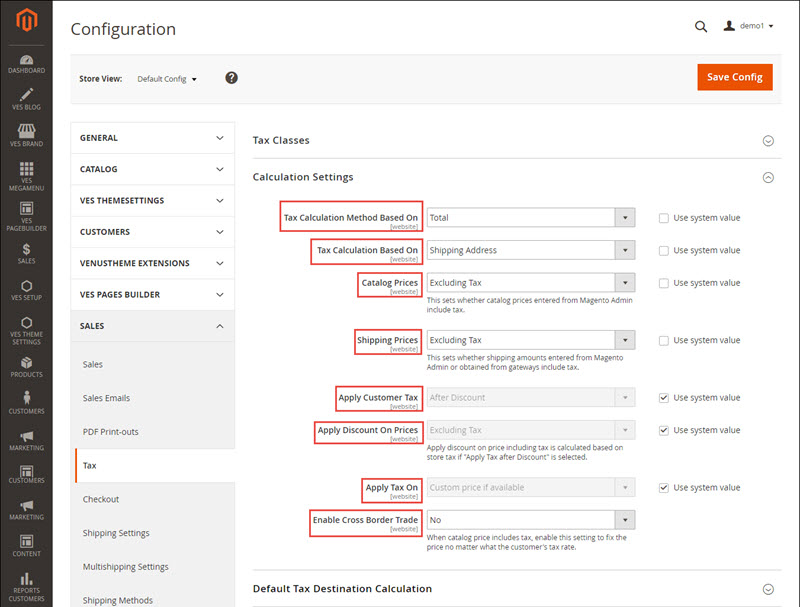
Tax Calculation Method Based On:
If you select Row Total: the tax will be accounted for each item line individually.
If you select Unit Price: the tax will be accounted for each unit.
And if you select Total the Price will be accounted for the Total Sum in the Order.
Tax Calculation Based On:
Here you can select which Tax rules will be applicable for orders that customers make on your e-store: shipping address, billing address, or your store’s shipping origin.
Select whether Catalog Prices and Shipping Prices will include or exclude Tax.
Define whether you would like to Apply Customer Tax before or after Discount.
Define if you would like to Apply Discount on Prices including of excluding Tax.
Select if you would like to Apply Tax On Custom or Original Prices.
If you sell your products across the border, then select “Yes†to Enable Cross Border Trade.
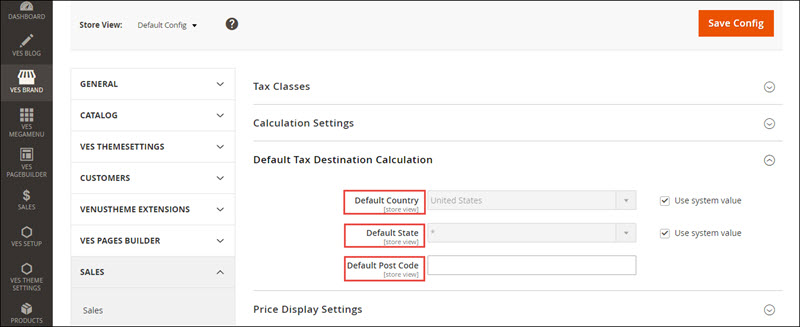
3. Default Tax Destination Calculation
You have to add your location here and its post code.
Now select your country first. If there is a Federal system in your country, then select the State. If there are no States in your country, this field will be gray and you won’t be able to select a State.
Then enter Post Code.
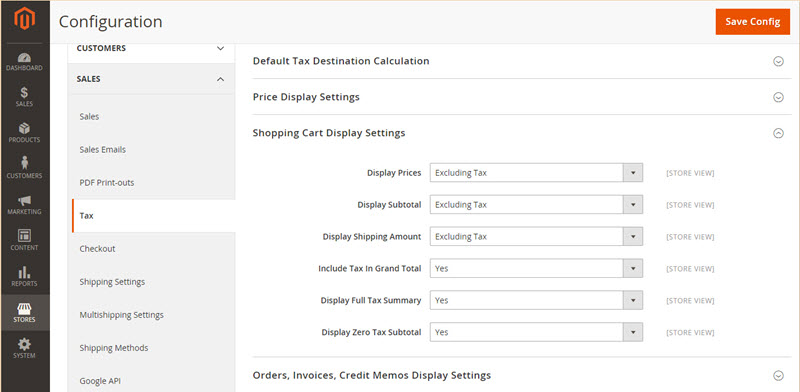
4. Shopping Cart Display Settings
Here you can select How you want to display your Product and Shipping Prices: including Tax or excluding Tax or both of them.
5. Orders, Invoices and Credit Memos
The same settings as the guide above:

6. Fixed Product Taxes (FPT):
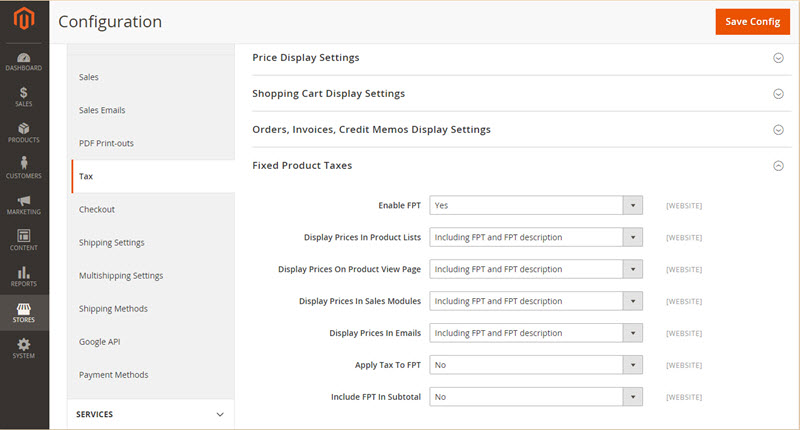
If you sell products taxes for which are fixed, enable this option.
Manage display settings: select if you would like to include FPT and FPT description. If there is a tax applicable to FPR, select “Yes†to Apply Tax to FPT.
Select if you would like to Include FPT in Subtotal.
Now we have done with General Tax Settings. Don’t forget to press Save button.
After all, please Clear Cache Via Admin System: Go to System >> Cache Management >> Enable >> Submit
You’ve finished Set up Tax and Manage Tax Rate Magento 2. We hope that our Blog will help your Tax setting more simple and easy to control it.
Related Blog posts You May Be Interested In:
- Top 10+ Magento 2 Reward Points Extensions
- 10+ Best Magento 2 Store Locator Extension Free & Premium
- 14+ Best Magento 2 Social Login Extension Free & Premium
- Top 9 Magento 2 Reward Points Extension Free & Premium
- Top 10 Magento 2 Blog Extension Free & Premium
- 10+ Best Magento 2 FAQ Extension Free & Premium


