


As you may know, header and footer are key elements of a website. Typically, they contain links to important pages on your site that potential customers will often want to visit before making a purchase or enquiry.
That’s not all!
Header is the first thing that people will see when they land on your site. It sets the tone for the whole site. You need to include enough information in the header to encourage customers to explore your site further. While footer of a website is just as important as the header, as it is the last chance for you to grab a customer’s attention and encourage them to complete an action, such as making a purchase or requesting information.
In this tutorial today, I will present you the way to Add Custom Header and Footer Links in magento 2.
Table of Contents
I. How is Custom Header Links added in Magento 2?
Step 1: Create a custom module based on Magento 2 structure in the folder app/code.
Ex: Magento 2 root directory/app/code/Dckap/Newlink/
Step 2: Create module.xml file in the below path to define your Magento 2 extension.
Magento 2 root directory/app/code/Dckap/Newlink/etc/module.xml
<?xml version=“1.0�>
<config xmlns:xsi=“http://www.w3.org/2001/XMLSchema-instance”xsi:noNamespaceSchemaLocation=“../../../../../lib/internal/Magento/Framework/Module/etc/module.xsd”>
<module name=“Dckap_Newlink” setup_version=“2.0.1”></module>
</config>
Magento 2 root directory/app/Dckap/Newlink/etc/frontend/routes.xml
<?xml version=“1.0”?>
<config xmlns:xsi=“http://www.w3.org/2001/XMLSchema-instance”xsi:noNamespaceSchemaLocation=“../../../../../../lib/internal/Magento/Framework/App/etc/routes.xsd”>
<router id=“standard”>
<route id=“newlink” frontName=“newlink”>
<module name=“Dckap_Newlink” />
</route>
</router>
</config>
Step 4: Create layout file in the below path for a custom header.
Magento2 root directory/app/Dckap/Newlink/view/frontend/layout/header.xml
<?xml version=“1.0”?>
<page xmlns:xsi=“http://www.w3.org/2001/XMLSchema-instance” layout=“1column”xsi:noNamespaceSchemaLocation=“../../../../../../../lib/internal/Magento/Framework/View/Layout/etc/page_configuration.xsd”>
<body>
<referenceBlock name=“header.links”>
<move element=“test-last” destination=“header.links”/>
<block class=“Dckap\Newlink\Block\Header” name=“test-link” after=“my-account-link”/>
</referenceBlock>
</body>
</page>
Step 5: Create block file that is referred in the layout file in the below path.
Magento2 root directory/app/Dckap/Newlink/Block/Header.php
<?php
namespace Dckap\Newlink\Block;
class Header extends \Magento\Framework\View\Element\Html\Link
{
protected $_template = ‘Dckap_Newlink::link.phtml’;
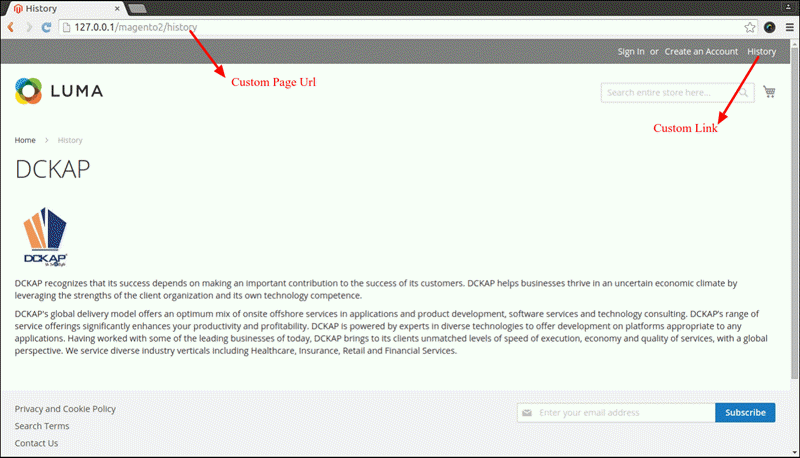
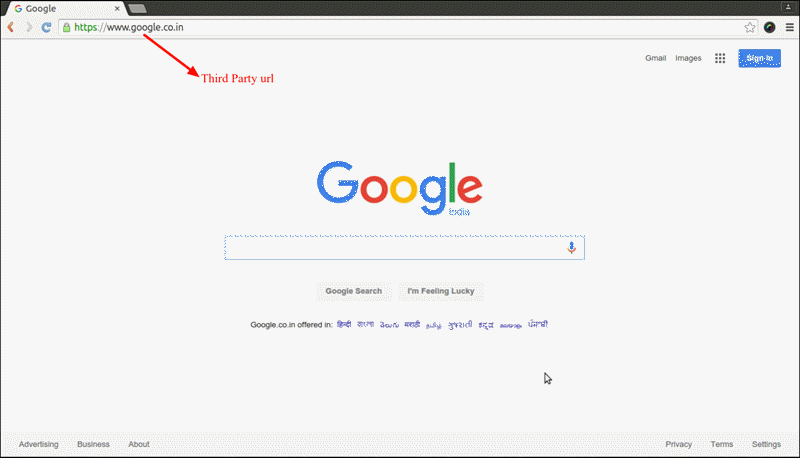
public function getHref()
{
return__(Â ‘testuser’);
}
public function getLabel()
{
return __(‘Test Link’);
}
}
?>
For third party URLs follow the above code.
Step 6: Create template file that is referred to the block file in the below path.
Magento2 root directory/app/Dckap/Newlink/frontend/templates/link.phtml
<li>
<a <?php echo $block->getLinkAttributes() ?>><?php echo $block->escapeHtml($block->getLabel())?>
<?php echo($block->getCounter()) ? ‘<span>‘ . $block->escapeHtml($block->getCounter()) . ‘</span>‘ : ”; ?>
</a>
</li>
php bin/magento setup:upgrade
II. The fast and smooth way to add Custom Footer Links in Magento 2:
Step 1: Now to add custom footer link follow the above first 3 steps and replace the layout file with the below code:
Magento2 root directory/app/Dckap/Newlink/view/frontend/layout/footer.xml
<?xml version=“1.0”?>
<page xmlns:xsi=“http://www.w3.org/2001/XMLSchema-instance” layout=“1column”xsi:noNamespaceSchemaLocation=“../../../../../../../lib/internal/Magento/Framework/View/Layout/etc/page_configuration.xsd”>
<page>
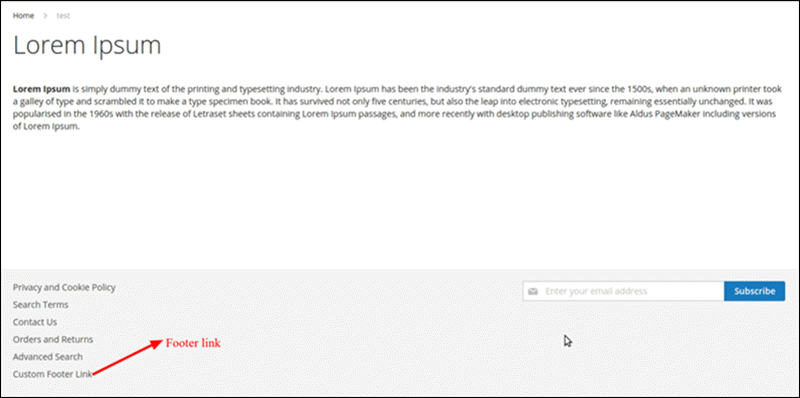
<referenceBlock name=“footer_links”>
<block class=“Magento\Framework\View\Element\Html\Link\Current” name=“2custom-link”>
<arguments>
<argument name=“label” xsi:type=“string”>Footer Link</argument>
<argument name=“path” xsi:type=“string”>testuser</argument>
</arguments>
</block>
</referenceBlock>
</page>
Step 2. There are 2 ways of getting the argument values:
1.By using block file. (used for header link)
2.By specifying argument values in the layout file.(used for footer link)
Step 3: Now follow the above step(step 7).
Check the browser to see your custom header and footer links.

Hopefully, this blog will be a help for you to add custom header and footer links in Magento 2 and make your site more attractive and clearer.
Related Blogposts You May be Interested In:
- Top 10+ Magento 2 Reward Points Extensions
- 10+ Best Magento 2 Store Locator Extension Free & Premium
- 14+ Best Magento 2 Social Login Extension Free & Premium
- Top 9 Magento 2 Reward Points Extension Free & Premium
- Top 10 Magento 2 Blog Extension Free & Premium
- 10+ Best Magento 2 FAQ Extension Free & Premium


I am trying to add more links to the header but I am having some errors in the code as I have seen the code from https://magenticians.com/magento-2-add-header-link/ and i don’t know where i am doing wrong
class Link extends \Magento\Framework\View\Element\Html\Link
{
/**
* Render block HTML.
*
* @return string
*/
protected function _toHtml()
{
if (false = $this->getTemplate())
{
return parent::_toHtml();
}
return ‘getLinkAttributes() . ‘ >’ . $this->escapeHtml($this->getLabel()) . ‘‘;
}
}
Comments are closed.