Your Magento-powered store is up and running, and it looks pretty great. But if I’m being honest, using the default theme might make your site look just like countless others out there.
To truly stand out and create a memorable shopping experience, customizing your Magento theme is the way to go. It’s one of the best UI tactics that can drive engagement and conversions for your brand.
With the right tweaks and adjustments, you can transform the default design into a unique, branded look that resonates with your target audience.
In this guide, I’ll discuss how to customize Magento default theme and ensure your store reflects your vision and brand identity.
Table of Contents
Why should you customize Magento Default Theme?
You might be wondering, “Why customize when the default theme already works?” With over 665,000 sites using Magento (as illustrated below), customizing your theme allows you to create a storefront that is uniquely yours.

Here are some more compelling reasons to customize Magento default theme:
Reinforce Your Brand Identity
Your colors, logo, typography, and images all work together to create a cohesive brand identity. Customizing your theme lets you showcase your brand’s unique personality, ensuring customers recognize and remember your online business every time they visit.
Deliver a better customer experience (CX)
When customers can navigate your site easily and enjoy its aesthetic, they’re more likely to stay longer and make a purchase. Customization allows you to create a seamless, user-friendly customer experience by improving layouts, navigation, and store features.
Stand out from the competition
By customizing your site, you can differentiate yourself from other brands already using Magento default theme. According to Attrock, improving your website’s design is also one of the ways you can scale your business. A unique design makes your store more professional, polished, and trustworthy.
Understanding Magento Theme structure
Before discussing how to customize Magento default theme, let me quickly break down the key components of this web development theme:
- Layout: These files specify the placement of blocks (such as headers, footers, and sidebars) on each page and dictate the overall flow of your site.
- Template files: Template files control how your content is rendered on the front end. They combine HTML with PHP to pull dynamic data, such as product details or user information, into your site.
- CSS files: Cascading Style Sheets (CSS) handle your site’s visual styling, including colors, fonts, margins, overlay images, and animations.
- JavaScript files: These files add interactivity to your site, enabling features like image carousels, dropdown menus, and product filters.
How to customize Magento Default Theme?
Now that you know the basics, I’ll dive into how to customize Magento default theme for a more personalized and intuitive online store:
Step 1. Choose your approach
There are two main ways to customize Magento default theme:
- Direct theme modification
This involves editing the default theme files directly. While it may seem quicker, this method is risky because any Magento updates could overwrite your changes.
- Create a child theme
The best practice is to create a child theme. A child theme inherits functionality from the parent theme but allows you to override files safely. This approach ensures updates won’t disrupt your changes.
Step 2. Customizing your theme with the theme editor
Magento built-in theme editor is a user-friendly tool for making basic changes. This approach is perfect for beginners or minor changes but has limitations for advanced customizations.
1. Log in to your Admin Panel
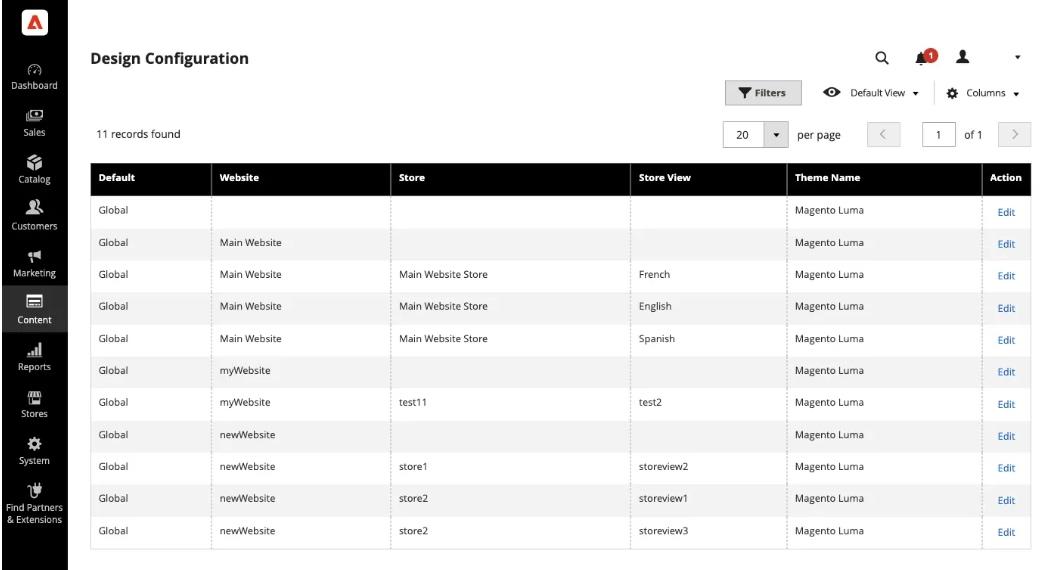
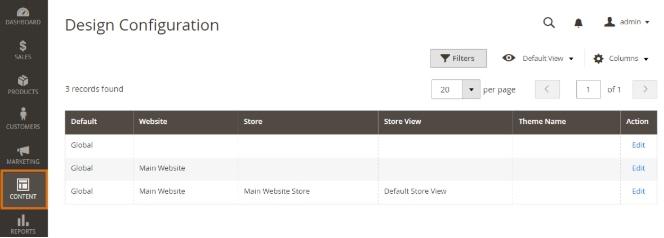
2. Navigate to Content > Design > Configuration

3. Select your theme and edit settings such as:
- Logo
- Colors
- Footer
Step 3. Creating a child theme for advanced customization
For a deeper level of control, creating a child theme is ideal. Here’s how to customize Magento default theme using this method:
- Clone your store: Before making changes, clone your store to a staging environment. This ensures your live site remains unaffected in case something goes wrong.
- Enable developer mode: Developer mode enables advanced debugging and quicker updates. Use this command in your terminal: php bin/magento deploy:mode:set developer
- Create a child theme:
Magento themes are located in the app/design/frontend/ directory. Within this, you’ll find folders organized by vendor names and themes.
1. Create a folder for your theme using this structure:
app/design/frontend/<VendorName>/<ThemeName>/Replace <VendorName> with your business name or identifier and <ThemeName> with your child theme name.
2. Inside your theme folder, create a theme.xml file at:
app/design/frontend/<VendorName>/<ThemeName>/theme.xmlUse the following command to declare your theme:
<theme xmlns:xsi="http://www.w3.org/2001/XMLSchema-instance" xsi:noNamespaceSchemaLocation="urn:magento:framework:Config/etc/theme.xsd"> <title>Your Child Theme Name</title> <parent>ParentVendor/ParentTheme</parent></theme>Replace Your Child Theme Name with your desired name.
Replace ParentVendor/ParentTheme with the vendor and theme name of the parent theme.
3. In your theme directory, create a registration.php file:
app/design/frontend/<VendorName>/<ThemeName>/registration.phpAdd the following content:
<?phpuse Magento\Framework\Component\ComponentRegistrar;ComponentRegistrar::register( ComponentRegistrar::THEME, 'frontend/<VendorName>/<ThemeName>', __DIR__);Step 4. Customize the look
Now that you’ve set up your child theme, you can start customizing your website:
1. Modify CSS
- Add a new CSS file in this folder:
app/design/frontend/<VendorName>/<ThemeName>/web/css/- Write CSS rules to override the default styles and create a look that reflects your branding.
2. Edit Layouts with XML
- Modify the XML layout files in this directory:
app/design/frontend/<VendorName>/<ThemeName>/etc/ - Use Handlebars templates to create dynamic and flexible layouts.
3. Change Templates
- Create copies of the template files you want to customize here:
app/design/frontend/<VendorName>/<ThemeName>/Magento_Theme/templates/- Edit the HTML, CSS, and PHP code to change the appearance and behavior of your store’s elements.
4. Add Custom JavaScript
- Create a new JavaScript file here:
app/design/frontend/VendorName/ThemeName/web/js/ directory.
- Write a custom JavaScript code to add interactivity and dynamic ecommerce website features to your store.
Step 5. Configure the theme in Admin Panel
Here’s how to configure your child theme:
- Log in to the Magento Admin Panel
- Go to Content > Design > Configuration

- Find the store view where you want to apply the theme and click Edit
- Select your child theme from the Applied Theme dropdown

- Click Save Configuration
Step 6. Test thoroughly
Before launching your new theme, test everything:
- Functionality: Check that links, forms, and features work as expected
- Responsiveness: Test on various devices and browsers
- Performance: Use tools like Google PageSpeed Insights to ensure fast load times
Step 7. Deploy your custom theme
Once you’re satisfied, it’s time to deploy your custom theme using these commands:
- Switch to production mode: bin/magento deploy:mode:set production
- Deploy static content: bin/magento setup:static-content:deploy
- Clear the cache: bin/magento cache:flush
Final thoughts
And there you have it! Now, you know how to customize Magento Default Theme to create a storefront that’s as unique as your brand. By carefully following the steps outlined in this guide, you can design a store that’s not only appealing but also delivers a seamless and enjoyable shopping experience for your customers.
With Magento flexibility and your creativity, the possibilities are endless. Start customizing today to optimize your website performance and transform your store into a distinctive digital space.


![[SALE OFF] Discount 30% All Premium Extensions On Christmas And New Year 2025 christmas-and-new-year-2025](https://landofcoder.b-cdn.net/wp-content/uploads/2024/12/christmas-and-new-year-2025-1-218x150.png)


